https://youtu.be/x4_e_Cr4EeA
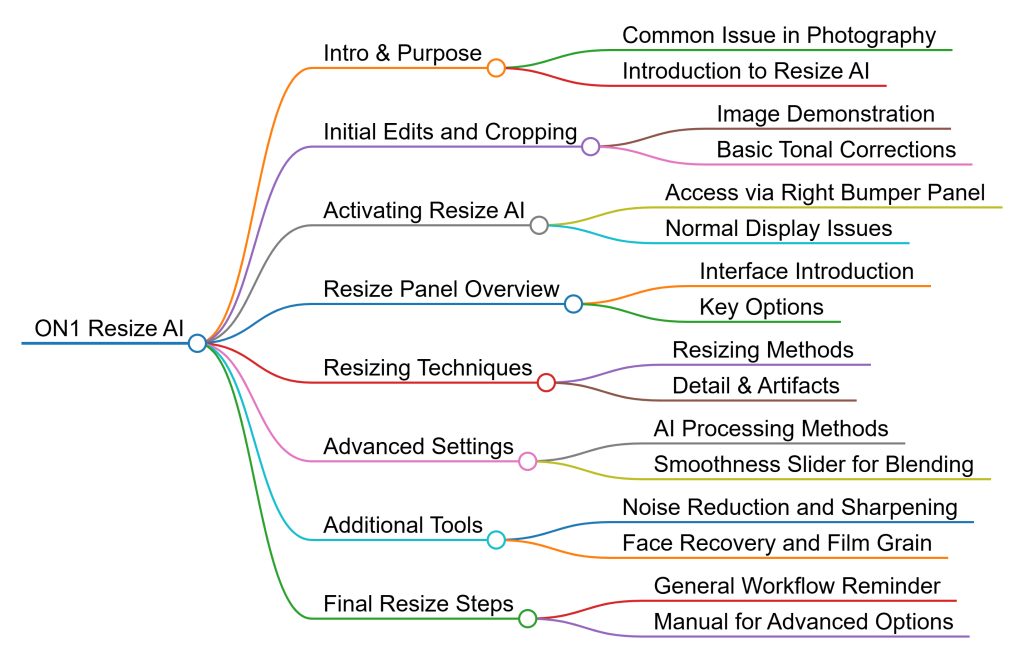
Intro & Purpose
Start: 0:04
The video begins by addressing a common issue in photography—cropping too much and ending up with a low-resolution image that’s unsuitable for printing. The speaker introduces Resize AI, an AI-powered upscaling tool built into ON1 Photo RAW, which helps enhance image resolution for better print quality.
Initial Edits and Cropping
Start: 0:56
The speaker opens ON1 Photo RAW and showcases an image of a bird captured with a Sony a7R IV. To achieve better magnification, they had used the camera’s crop sensor mode, effectively reducing the image to 26 megapixels. The speaker demonstrates how they cropped further into the image to achieve a better composition, despite not being a professional wildlife photographer. After cropping, they apply basic tonal corrections using Brilliance AI and noise reduction using NoNoise AI. The editing is emphasized as a crucial step to be completed before resizing.
Activating Resize AI
Start: 3:33
Once basic edits are applied, the speaker guides viewers through accessing Resize AI. They explain that Resize AI is accessed via the right bumper panel, which can be activated through the Window menu. Despite not using Resize AI frequently, they value the other tools in the right bumper, such as Print, Share, and Export. When Resize AI is launched, there may be initial display issues due to video card compatibility, which is normal.
Resize Panel Overview
Start: 5:10
The resize interface is introduced, and the speaker notes several available presets, which they personally do not use. Instead, they focus on the right-hand panel, which includes key options like photo size, noise reduction, sharpening, and more. The speaker points out that the image has been cropped to just 6.6 megapixels, which is acceptable for web use but insufficient for quality prints.
Resizing Techniques
Start: 6:57
The speaker explains several resizing methods. These include resizing by dimensions, long edge, short edge, width and height, or by specifying megapixels. They demonstrate resizing the image back to its original 26 megapixels and then experiment with increasing it to 33 and even 61 megapixels. While increasing to 33 megapixels shows more detail, pushing it to 61 megapixels introduces visible artifacts, highlighting the limitations of AI upscaling. Resolution settings like 72 and 300 DPI are adjusted, but these mainly affect print quality rather than the on-screen preview.
Advanced Settings
Start: 11:12
In the final segment, the speaker explores advanced settings under the “Settings” tab. Here, users can choose different AI processing methods like “2023,” “2023 Faithful,” “Genuine Fractals,” and “Bicubic.” Although the speaker admits to not knowing the technical differences between them, they suggest experimenting. The “Smoothness” slider is also discussed—it helps blend the newly created pixels with the original ones, reducing artifacting. Viewers are encouraged to tweak these settings based on their image.
Additional Tools
Start: 12:36
The speaker continues exploring the Resize AI panel, starting with noise reduction. Unlike NoNoise AI, this tool has less granular control, but still offers basic noise removal. However, users are reminded that it’s better to handle noise reduction before entering the Resize AI module. The same advice applies to sharpening—although sharpening is available here, it’s preferable to do it beforehand using tools like NoNoise AI or Tack Sharp AI. Face Recovery is then briefly discussed; while not applicable in this example, it can be useful when upscaling portraits. Film grain is available but not recommended unless users are skipping ON1’s editing process entirely. The speaker emphasizes that editing should be completed before resizing for the best results.
Final Resize Steps
Start: 14:20
The speaker reiterates their general workflow—fully edit the image first, then resize as the last step to upscale the final version. Options like Tiling and Gallery Wrap are mentioned but not covered due to lack of personal use. Users are directed to the manual for more information on these.
Saving the Image
Start: 15:01
After configuring settings, the speaker hits the blue checkmark, which initiates the saving process. ON1 compresses all the adjustments into a single output file saved in the same folder as the original image. Users can rename the file or select a different format from options such as PSD, DNG, JPEG, TIFF, PNG, or JXL. The speaker prefers using DNG for working files, but recommends JPEG or TIFF as final formats, especially TIFF for print due to its higher data retention.
File Output and Results
Start: 17:10
Upon saving, Resize AI exits and returns the user to the main Browse workspace. The speaker accesses grid view and shows the newly created TIFF file beside the original. The upscaled image retains similar dimensions to the original cropped version and is deemed suitable for printing. While not perfect, the results are solid for regaining printability and resolution after cropping.
Final Thoughts
Start: 18:32
The speaker concludes by emphasizing Resize AI’s value in making cropped images printable again. Though it isn’t flawless, it’s a helpful tool, especially in scenarios involving printing, online sharing, or enhancing old scanned photos. The speaker admits they don’t use it frequently, only when necessary, and invites viewers to like the video and leave comments with questions. The video ends with a message encouraging creativity and continued inspiration.
There’s a pdf ‘cheat sheet’ here – print it double sided or download it to your phone and you’ll always have it handy and here’s a ‘mind map’.