Introduction
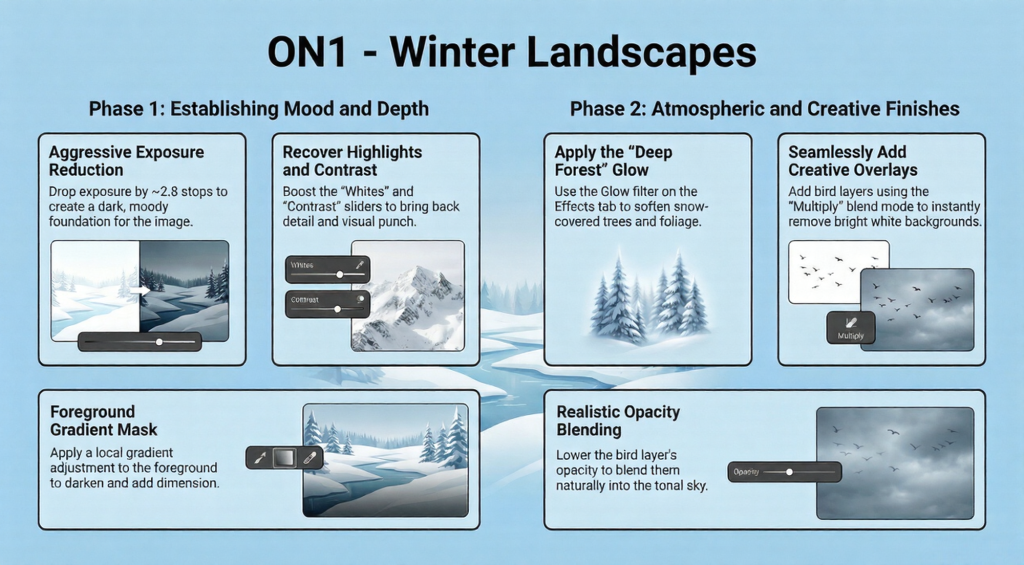
This tutorial explains how to convert bland winter photography into atmospheric, moody art using ON1 Photo RAW. The process begins with significant exposure reductions and contrast tweaks to eliminate the flat appearance common in snowy scenes. Targeted foreground adjustments and the application of a Glow filter are then used to introduce depth and a dreamy, ethereal aesthetic.
To finalise the composition, Dylan demonstrates how to incorporate bird overlays by using specific blending modes to remove unwanted backgrounds. Ultimately, these techniques provide a comprehensive workflow for adding drama and storytelling to cold-weather landscapes.
Section 1: Addressing the Brightness and Flatness of Winter Landscapes
Winter landscapes often suffer from brightness and flatness, making them appear dull and lacking mood. To tackle this, the instructor begins by adjusting the image in the Develop tab of ON1 Photo RAW, focusing on tone and color corrections.
- Exposure Reduction: The exposure is pulled back significantly—about 2.8 stops in this example—to darken the overall image. This step might initially make the photo look too dark but is essential for setting a moody foundation.
- Contrast and Whites Adjustment: After lowering exposure, contrast is increased to bring back depth and detail, along with a boost in the whites slider to add brightness selectively, enhancing the highlights and preventing the image from appearing flat.
- Comparison: Using the backslash key toggles between the original and edited images, showing a clear transformation from a bright, flat scene to a dramatic, contrasted winter landscape.
This combination of exposure, contrast, and whites adjustments is recommended as a foundational step to add mood and drama to any winter landscape.
Section 2: Applying Local Adjustments to Enhance Foreground
The foreground in many winter landscapes can lack interest or detail. To improve this, a local adjustment is applied specifically to the bottom foreground area using a gradient mask.
- Gradient Mask Tool: Accessed through the local adjustments menu, the gradient mask is positioned over the lower part of the image where the foreground resides. It can be moved and rotated using two handles for precise placement.
- Mask Visualization: Pressing the ‘O’ key displays the mask overlay to ensure accurate coverage of the desired area.
- Edits within Mask: The exposure is pulled back about three-quarters of a stop to darken the foreground subtly. Contrast is increased to add depth, and whites are slightly boosted (around 7 or 8 points) to add a natural punchiness.
- Effect: These adjustments prevent the foreground from appearing dull and flat, creating dimension and enhancing the overall mood without overdoing the effect.
This step highlights the importance of selective edits to balance different parts of the image and maintain viewer interest.
Section 3: Creating the Dreamy Effect with a Glow Filter
To achieve the characteristic dreamy vibe often associated with winter landscapes, the instructor introduces the Glow filter found in the Effects tab.
- Glow Filter Selection: The filter is applied, and under the style options, the “Deep Forest” preset is chosen. This preset softens the image, especially benefiting the snow-covered trees and foliage by adding a gentle glow effect.
- Visual Impact: The filter enhances the softness and ethereal quality of the scene, further amplifying the moody and dreamy atmosphere.
- Before and After: A quick toggle between the original and edited photos shows how easily the glow filter transforms the image, making it feel more inviting and magical.
This section emphasizes the power of specialized filters in ON1 Photo RAW to add stylistic effects quickly and effectively.
Section 4: Adding Creative Interest by Incorporating Birds
To introduce a creative element and add interest to the tonal sky background, Dylan demonstrates how to add birds flying in the distance using ON1 Photo RAW’s layers feature. This creative step shows how to add subtle storytelling elements that enrich the photograph without overwhelming the natural beauty of the winter landscape.
- Accessing Extras: A new layer is added, and from the Extras folder under double exposures, bird graphics are selected from the animal section.
- Placing Birds: The chosen bird overlay is inserted directly into the photo. However, it initially has a bright white background that looks unnatural.
- Removing White Background: The blend mode for the bird layer is changed to Multiply, which effectively removes the white background by blending it with the underlying image. This technique targets the white areas and makes them transparent, seamlessly integrating the birds.
- Transform and Position: Using the transform tool (shortcut V), the birds are resized proportionally (holding Shift) and rotated to fit naturally into the sky area.
- Opacity Adjustment: To further enhance realism, the opacity of the bird layer is lowered, allowing the birds to blend softly into the scene rather than appearing stark or artificial.
Quick Steps
The Power of Drastic Underexposure – Pull exposure back roughly 2.8 stops. Crushing these values creates an intentional, moody foundation for building dramatic tonal depth.”Don’t be afraid to pull back on your exposure.”
Reclaiming Punch via the Whites Slider – Boosting Whites and Contrast prevents a muddy, grey appearance. This targets highlight brilliance to maintain tonal separation and vibrancy.
Anchoring the Eye with Gradients – Apply a local gradient at -0.75 exposure and +8 whites. This provides visual anchoring and dimension via tonal weight.
The “Deep Forest” Winter Secret – Choose a glow style – The “Deep Forest” adds an ethereal, magical quality, softening snow-covered foliage for a perfectly hazy, winter vibe.
The “Multiply” Blend Mode Hack – Multiply targets pixels brighter than underlying layers, instantly dropping out white backgrounds for rapid, professional bird overlay integration.
Conclusion – Mastering winter moods requires looking past the “perfect” histogram.