see also https://www.anthonymorganti.com/blog/the-new-layer-masking-in-on1-photo-raw
1. The “Orientation First” Rule
The cornerstone of a professional workflow is establishing your canvas before a single mask is drawn. You must decide on your final format—horizontal or vertical—and open that background file first to set the project’s dimensions.
Pro Tip: Always hold the Shift key while resizing to maintain the correct aspect ratio and avoid the amateur mistake of distorting your subject’s proportions.
2. Stay RAW for a Better Match
To achieve a perfect blend, start the process using unedited RAW files for both the subject and the background layers. This is the cornerstone of a non-destructive workflow because it allows you to synchronize lighting, color temperature, and tones after the layers are together in the same space.
Pro Tip: Adding layers to a RAW file in ON1 creates a specialized .onphoto file format, which preserves all your original data while keeping your edits entirely reversible.
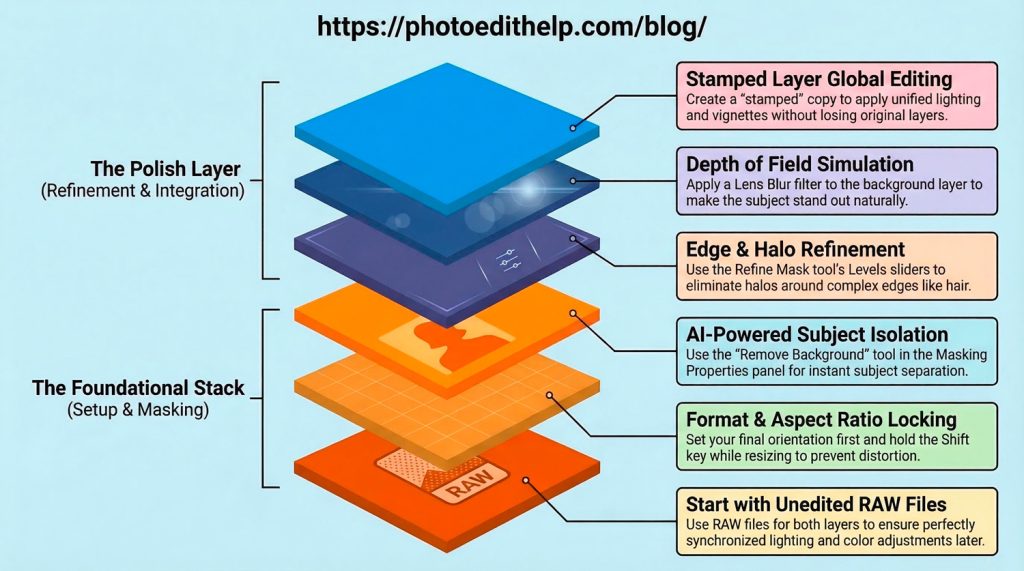
3. The AI “Remove Background” Is Only the Starting Line
While ON1s’ AI masking tools are revolutionary, they are rarely the “final” step for a professional. Automatic tools often leave behind a distracting “bright halo,” particularly in the fine details of a subject’s hair. To fix this, you must enter the Refine Mask dialog and master the Levels sliders. Move the middle slider to the right and the far-right slider to the left; this specifically targets and chokes back those edge artifacts that scream “fake.”
Pro Tip: “A common mistake is closing the Refine Mask window by hitting the ‘X’ instead of ‘OK,’ which discards all your adjustments.”
4. Simulating Depth with Lens Blur
A composite often looks “off” because the background is too sharp, defying the optical physics of a real camera lens. By applying a Lens Blur filter specifically to the background layer, you simulate a shallow depth of field that mimics real-world gear.
Pro Tip: This technique establishes a clear Visual Hierarchy, directing the viewer’s eye away from background distractions and toward your subject. This subtle blur is the secret to making a subject “pop,” providing the three-dimensional depth required for a believable image.
5. The Power of “Stamping” Over Merging
When you move from editing individual layers to applying global finishes, you must choose your method of consolidation carefully. “Stamping” is the professional choice because it provides a critical safety net that standard merging lacks.
- Standard Merging: Permanently flattens your layers, making it impossible to fix a masking error found later. Stamped Layers: Creates a new, merged copy of all visible layers at the top of the stack while keeping the original, editable layers underneath.The Pro Safety Net: If you notice a flaw in your subject’s mask after applying global edits, you simply delete the stamped layer, fix the original, and re-stamp.
6. The Final “Glue”: Vignettes and Lighting Presets
The final stage of the process involves “gluing” the layers together so they share the same atmospheric energy. Apply a Depth Lighting filter to your stamped layer, specifically the Highkey Warm preset, to harmonize the light hitting both the subject and the environment.
Pro Tip : Navigate to the Develop tab to fine-tune the exposure and balance the overall brightness of the scene. Finish the piece with a soft vignette, using the offset slider to shift the darkening effect away from the subject’s face, ensuring the composition is framed without losing the focal point.
Conclusion: From Possible to Impossible
Transitioning from a basic “cut-and-paste” approach to a professional composite requires a disciplined, non-destructive mindset. By prioritizing your orientation, working with RAW data, and using optical physics to guide your blurring and lighting, you can create images that challenge the viewer’s sense of reality.