Todd Dominey video https://youtu.be/BTe0JLe5g2Y Tony Kuyper website https://goodlight.us/
MVA = Median Value Adjustment
This blog entry introduces a sophisticated method for refining image contrast by identifying the true tonal midpoint rather than relying on default software settings.
Standard adjustment tools often assume a universal balance point, which frequently leads to unwanted darkening in low-key photos or over-brightening in high-key scenes. By locating the median value within a histogram, editors can anchor their curves adjustments to the image’s actual luminosity center for a more natural result. This technique is highly effective for both global enhancements and localised adjustments, such as boosting detail in a specific sky region.
The “Muddy” Contrast Mystery Why do your lowkey images turn “muddy” or unintentionally darker the moment you apply contrast? This common frustration occurs because standard tools often fight the image’s natural exposure rather than enhancing it. Median Value Adjustment (MVA) is the professional solution that enforces tonal integrity by identifying the image’s true gravitational center.
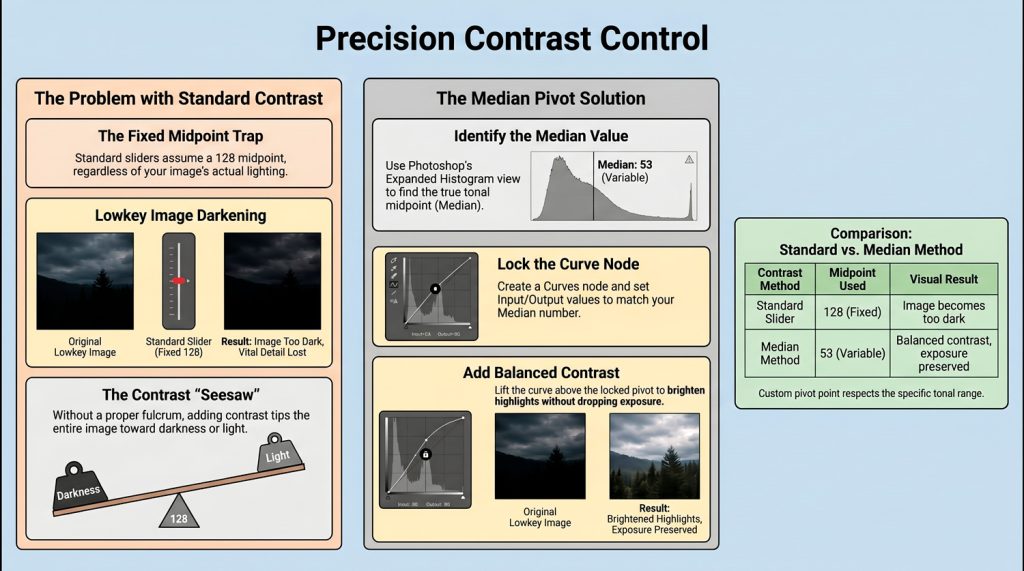
The “128” Default Trap Standard contrast sliders and S-curve presets operate on a fixed technical assumption: that the tonal midpoint of every image is 128 (the 50% line). In a lowkey image, this “unbalanced” approach is a mathematical disaster; you are essentially manipulating “nothing but air” above the midpoint while collapsing the shadows below it, ruining the intended mood and depth.
Finding the “Fulcrum” To achieve high-end results, you must locate the real tonal midpoint of your specific file. Ensure you are viewing the Luminosity channel. Look for the Median value; for instance, a moody landscape may show a median of 53. This demonstrates how significantly an image’s true midpoint can deviate from the default 128.
The Technique: Locking the Custom Pivot Point Once the median is identified, use a Curves Adjustment Layer to apply the MVA technique:
- Create a single node on the curve.
- Manually set both the Input and Output values to match your median (e.g., 53). This locks the “pivot point” of your tonal seesaw.
- Create a second node just to the right of this locked point and lift it.
This specific movement “drives a wedge” between tones, injecting light into the highlights and increasing contrast without dropping the overall exposure or clipping your blacks.
The Philosophy of Tonal Balance
“If you think about it like a seesaw… where would you put that pivot point in between the light and the dark in order to achieve what it is that you’re trying to get contrast-wise?”
Precision Scaling: Local MVA Adjustments MVA is equally effective for localized edits. When you select a specific region, such as a bright sky, Photoshop’s histogram dynamically updates to reflect only that selection. A sky may have a unique median of 177. Using this specific value as a pivot point allows for tailored contrast that respects the unique dynamic range of that specific region.