Finding a signature style is a huge part of photography, but the tools—presets, filters, and Look-Up Tables (LUTs)—can get confusing. While they often get lumped together, LUTs are a different beast entirely. Borrowed from cinema, they are powerful engines for color grading, not just simple filters.
Here are five truths about using LUTs in ON1 Photo RAW to help you move from guesswork to intentional, artistic control.
1. They Are Not Just “Fancy Presets”
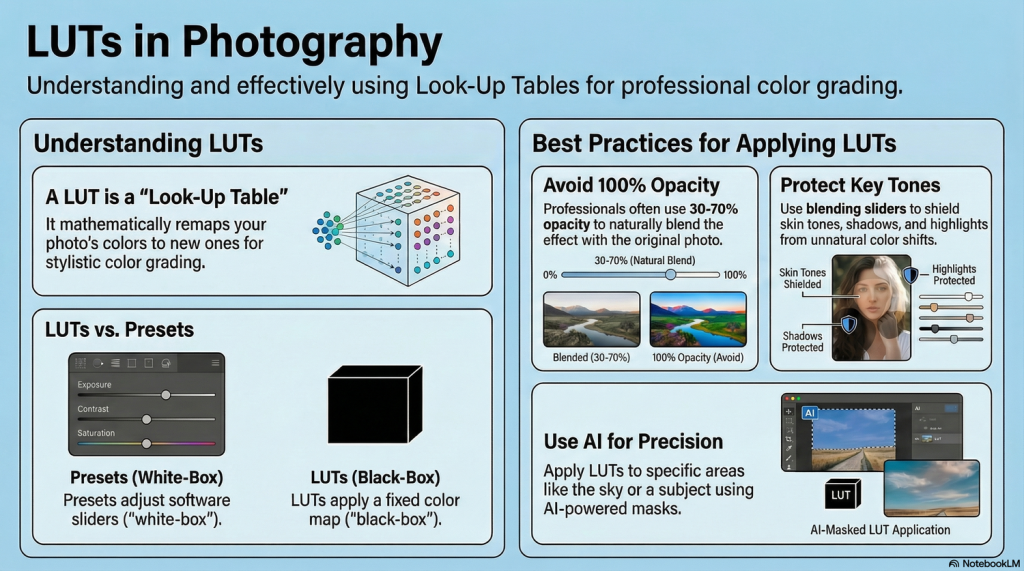
- Presets (White Box): These are saved recipes of slider settings. When applied, you see your Exposure or Contrast sliders move, and you can tweak them. LUTs (Black Box) are mathematical tables that remap colors directly without touching your basic sliders.
- Why it matters: Because LUTs use universal files (.cube), you can use the exact same color grade in ON1, Photoshop, Photopea, Luminar and many others, making them perfect for maintaining a consistent brand irrespective of editing platform.
2. The “100% Opacity” Trap
The most common mistake? Slapping a LUT on at full strength. This often crushes shadows or creates unnatural skin tones.
- The Fix: Treat a LUT as a starting point, not the finish line. The Sweet Spot: Dial the opacity back to 30% – 50%. This blends the cinematic grade with your original image’s natural tones for a polished, nuanced look.
3. Use the Hidden “Protection” Sliders
In ON1, the true power of the LUT filter is hidden in the gear menu. You will find protection sliders for Shadows, Highlights, and Skin.
- How they work: They act as “gates” to prevent the LUT from destroying image detail. Pro Tip: Use the Skin Tone Protection slider for portraits. It shields the subject’s face from color tints (like unwanted greens or magentas) while keeping the cinematic look on the background.
4. Static LUTs vs. Dynamic AI
A traditional LUT applies the exact same math to every photo, regardless of the content. ON1’s Match Color filter changes that game. Dynamic Analysis Instead of a fixed table, it analyzes a reference image (like a movie still or painting) and builds a “custom LUT” in real-time to match that vibe. Hybrid Workflow: It gives you a strong starting point based on AI analysis, which you can then refine with manual sliders for total control.
5. AI Masking Replaces Manual Grunt Work
Gone are the days of applying a grade globally or spending hours brushing on masks. With Super Select AI You can click on specific regions – like the sky, subject, or background – and apply a LUT only to that area. (e.g., Warm up the subject, cool down the background). Another function that adds a great deal is Depth Masks where AI is used “to map the 3D depth of your 2D image”. You can apply a LUT that increases in intensity as objects get further away, simulating realistic atmospheric haze.
The Bottom Line
The future of editing isn’t about choosing between manual control and AI—it’s about combining them. By understanding how to blend opacity, protect skin tones, and use depth-aware masking, you stop “finding” a look and start building one with intention.