
Fundamental Concepts of Blending
Blending modes change the way a layer reacts with the layer underneath it. To utilize a layer blend mode, a document must have at least two layers. The process involves three distinct elements:
| Element | Description |
|---|---|
| Base | The bottom layer (the original texture or image). |
| Blend | The top layer to which the blending mode is applied. |
| Result | The final combination of the two layers. |
Photoshop creates these results by comparing each channel of the base and blend layers. While the technical definitions are rooted in science, the primary objective for users is experimentation to achieve a desired visual outcome.
A 2-Minute Cheat Sheet + Real-World Editing Guide
⚡ The 2-Minute Cheat Sheet
The Only 3 Rules You Need
- White disappears → Darken modes
- Black disappears → Lighten modes
- 50% gray disappears → Contrast modes
That’s the entire system.
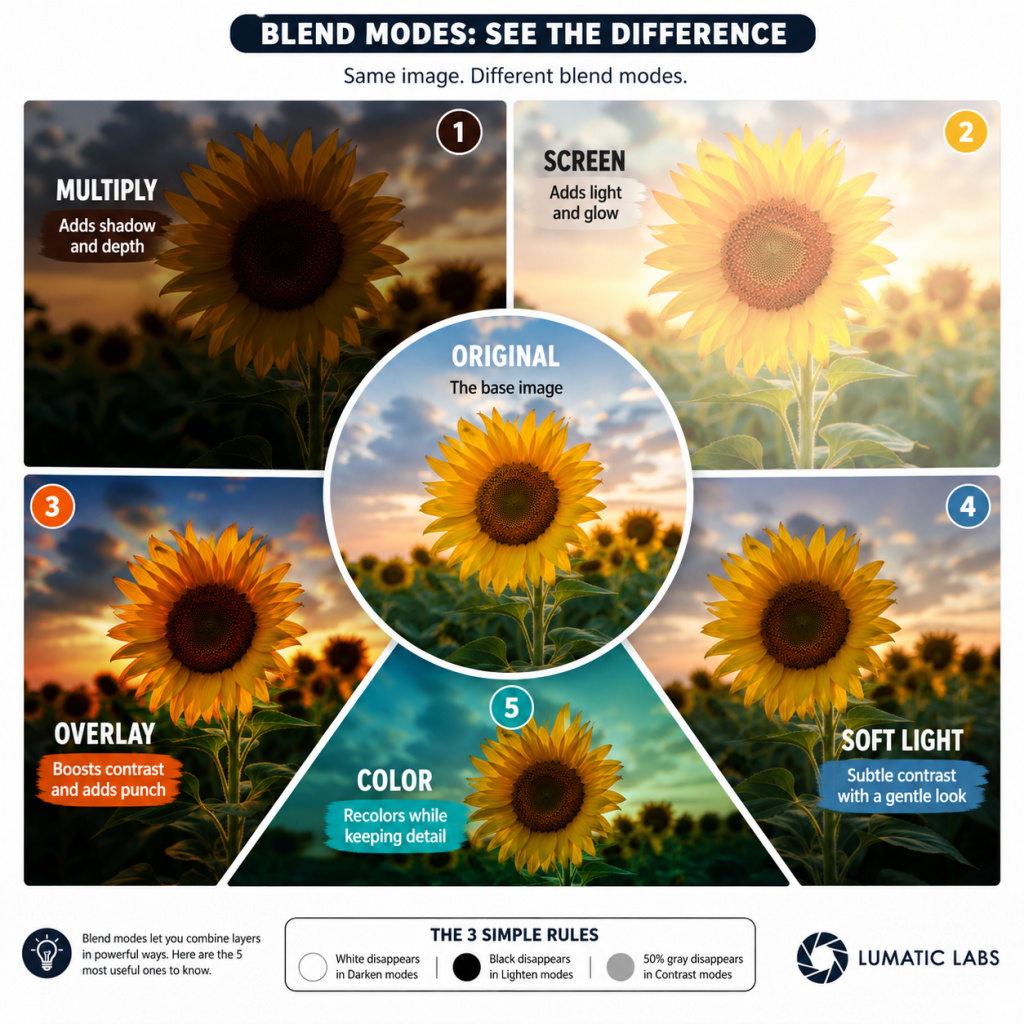
🎯 The 5 Blend Modes That Actually Matter (80/20 Rule)
The above image may be downloaded here.
| Mode | What it Does | When to Use |
|---|---|---|
| Multiply | Darkens like ink | Shadows, realism |
| Screen | Lightens like light | Glow, highlights |
| Overlay | Adds contrast | Punch, clarity |
| Soft Light | Gentle contrast | Cinematic look |
| Color | Applies color only | Color grading |
🧠 Memory Hooks
- Multiply = stacking ink
- Screen = projecting light
- Overlay = smart contrast
- Soft Light = subtle polish
- Color = recolour without damage
🎬 Real-World Editing Scenarios
1. Fix a Flat Photo
Steps:
- Duplicate layer
- Set to Overlay
- Reduce opacity to 20–30%
Result: Instant contrast and depth
Tip: Use Soft Light if Overlay feels too strong
2. Add Realistic Shadows
Steps:
- Paint soft black on a new layer
- Set to Multiply
- Blur slightly
- Lower opacity
Result: Objects feel grounded instead of “floating”
3. Create Glow Effects
Steps:
- Duplicate layer
- Apply blur
- Set to Screen or Linear Dodge (Add)
Result:
- Screen = natural glow
- Linear Dodge = intense glow
4. Cinematic Colour Grading (Teal–Orange)
Steps:
- Add a solid colour layer
- Set to Color
- Adjust opacity
Result: Professional film-style grading while keeping detail
5. Natural Skin Retouching
Steps:
- Apply smoothing layer
- Set to Soft Light
- Lower opacity
Result: Smooth but realistic skin (no plastic look)
6. Recolour an Object
Steps:
- Paint colour on a new layer
- Set to Color
Result: Changes colour but preserves lighting and texture
7. Perfect Image Alignment (Pro Trick)
Steps:
- Put one image over another
- Set to Difference
- Move layer until image turns black
Result: Perfect alignment !