
1. Photography in the 2026 Mirrorless Era
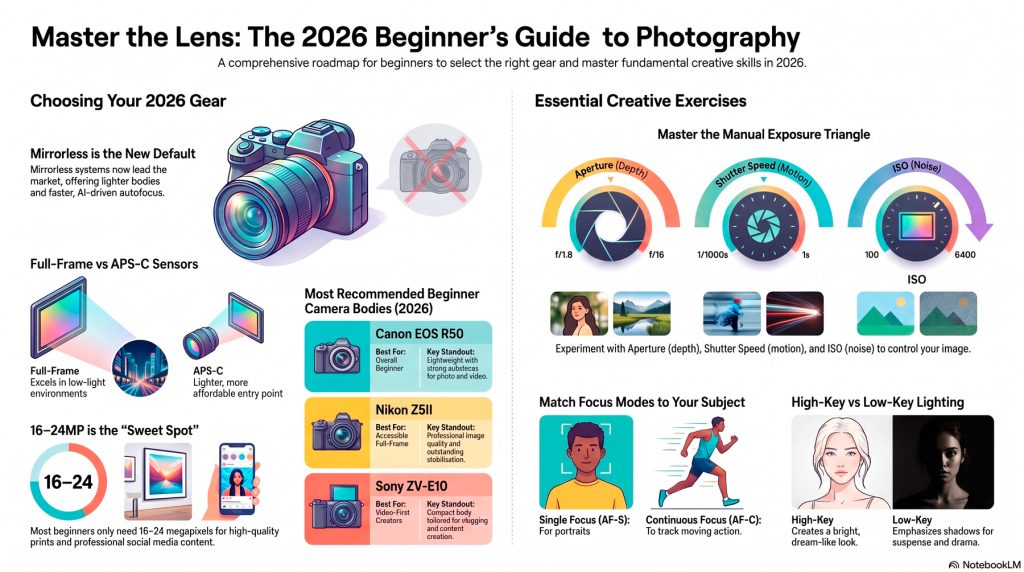
In 2026, moving from a smartphone to a dedicated mirrorless camera represents a decisive shift away from its’ algorithmic convenience. While smartphones utilize AI-driven automation to simulate depth and exposure, they frequently strip the photographer of understanding camera fundamentals, that transform a “snap” into a deliberate image, granting you total control over light and motion.
This guide provides 20 prioritized tips designed to empower a newcomer to master their hardware and move beyond basic photography to sophisticated visual storytelling. This is achieved by dissecting the technical core of exposure and manual operation to establish a professional foundation.
2. The Top 20 Camera Fundamental Tips for Newcomers
These 20 tips are prioritized by their immediate impact on image quality and creative agency. Mastering these settings allows you to transition from passive observation to active control, ensuring that your technical hardware serves your specific artistic vision.
- Mastering Manual Mode Access the “M” setting to independently control aperture, shutter speed, and ISO. This eliminates reliance on camera guesswork, ensuring consistent results in complex lighting. By taking manual control, you dictate exposure based on the scene’s emotional requirements rather than letting an AI average the light.
- Isolating Subjects with Aperture Set a wide aperture (e.g., f/2.8) to decrease depth of field. This creates authentic optical bokeh, separating your subject from the background. Unlike software-simulated blur, this provides professional-grade isolation and genuine depth, which is essential for portraits and high-end product imagery.
- Capturing Detail with Narrow Apertures Select a narrow aperture (e.g., f/16) for landscapes. This increases the depth of field, ensuring sharpness from the foreground to the horizon. Use this command to capture the immense scale of the Australian outback, ensuring every rock and distant mountain remains in crisp focus.
- Freezing Action with Shutter Speed Utilize a fast shutter speed (1/1000s or higher) to freeze rapid movement. This is critical for capturing sharp images of high-velocity subjects like AFL players or surfers at Bondi. The unique impact is a singular, crisp moment of action devoid of motion blur.
- Creating Intentional Motion Blur Lower the shutter speed to capture the “flow” of moving subjects, such as waterfalls or passing traffic. This introduces dynamic blur into the frame. This technique adds a sense of time and rhythm, transforming a static capture into a cinematic, moving narrative.
- Managing ISO for Image Clarity Adjust ISO based on ambient light: use ISO 100 for bright conditions and higher values for low light. Be aware that increasing ISO introduces noise or “grain.” Strategic ISO management allows for proper exposure in dark environments while maintaining maximum sensor detail.
- Applying the Rule of Thirds Enable the 3×3 grid overlay in your viewfinder. Position your primary subject along these lines or at their intersections. This compositional strategy creates balance and intrigue, guiding the viewer’s eye more effectively than a standard, static centered composition.
- Utilizing Continuous Focus (AF-C) Set the camera to continuous focus to track moving subjects as long as the shutter is half-pressed. This mode is optimal for sports and wildlife. The camera’s ability to lock onto movement ensures sharpness during high-speed action, even as the subject changes distance.
- Selecting Single Focus (AF-S) Use single-servo focus for static subjects like portraits or landscapes. Once locked, focus remains fixed until the shutter is released. This provides precision, allowing you to lock focus on a subject’s eye and then recompose the frame without losing the critical focal point.
- Overriding with Manual Focus Switch to manual focus for macro work or low-light scenes where autofocus struggles. Physically rotating the lens ring allows for microscopic precision. This is essential for capturing textures in jewelry or flowers where autofocus may “hunt” for a target in low contrast.
- Timing Natural Light Photograph the same scene at dawn, midday, and dusk to analyze how light intensity transforms the mood. Midday offers harsh intensity, while the “golden hour” provides a warm, gentle glow. Mastering light timing significantly enhances the emotional resonance and production value of your work.
- Adjusting Custom White Balance Manually set the color temperature using Kelvins (K) to match the light source. Shifting from warm to cool settings dramatically alters a scene’s atmosphere. This control ensures whites appear true and allows you to intentionally manipulate the emotional “temperature” of your colors.
- Mastering Depth of Field in Close-ups Combine a wide aperture with physical proximity to a subject. This isolates rich textures against a soft background. This technique forces the viewer to notice intricate details—like the grain in wood or the weave of a fabric—that are often lost in wider frames.
- Employing High-Key Lighting Set up a scene with abundant light and minimal shadows, slightly overexposing the shot. Use light backgrounds to achieve a bright, low-contrast look. The result is a clean, optimistic aesthetic that suggests high production value and a dream-like atmosphere.
- Executing Low-Key Lighting Underexpose the image slightly to emphasize shadows and create high contrast. This style evokes suspense and drama. By intentionally hiding details in the darkness, you direct the viewer’s focus toward specifically illuminated, emotionally charged elements within the frame.
- Identifying Symmetrical Patterns Frame scenes with repeating patterns or architectural symmetry to add harmony and rhythm. This strategic impact creates a feeling of structural balance and visual interest. It makes a composition feel more deliberate, professional, and visually satisfying to the viewer.
- Prioritizing Mirrorless Hardware Select mirrorless bodies to access real-time live previews of exposure and white balance in the electronic viewfinder (EVF). This feedback allows you to correct settings instantly before the shutter is pressed, reducing the trial-and-error cycle inherent in older DSLR systems.
- Understanding Sensor Formats Evaluate the difference between Full-Frame (FX) and APS-C (DX) sensors. Full-frame offers superior low-light performance, while the APS-C 1.5x crop factor extends the reach of telephoto lenses. Choose the format that aligns with your specific genre, such as wildlife or astrophotography.
- Leveraging Fast Sensor Readouts Utilize cameras with stacked or partially-stacked sensors (like the Nikon Z6III) to reduce rolling shutter distortion. This technology allows for faster readout speeds, ensuring moving vertical lines remain straight during rapid action. This is vital for high-speed sports and professional wildlife shooting.
- Protecting Gear in Harsh Environments Use weather-sealed bodies and lenses when shooting in coastal salt spray or outback dust. Wipe gear down with a dry cloth after sessions and use rocket blowers for maintenance. This ensures hardware longevity in Australia’s most demanding and corrosive shooting conditions.
Technical settings serve as the essential foundation, but their impact is fully realized only when synthesized with composition and environmental control.
3. Synthesizing Composition and Environmental Control
Composition (we have more detailed posts – and here) and lighting are the “visual language” of photography. Technical mastery is wasted if you cannot direct the viewer’s eye or manipulate their or the environment’s mood. Your strategic use of frame balance and light direction will ensure the image communicates with your specific artistic intent.
| Technique | Strategic Impact | Execution Tip |
|---|---|---|
| Rule of Thirds | Creates balance and intrigue by avoiding static, centered subjects. | Position subjects at the intersections of the 3×3 grid overlay. |
| Symmetry and Patterns | Adds a sense of harmony, rhythm, and structural stability to the frame. | Align architectural features or reflections precisely within the viewfinder. |
| High-Key Lighting | Conveys a clean, optimistic, or dream-like aesthetic with minimal shadows. | Use light backgrounds and slightly overexpose the image to reduce contrast. |
| Low-Key Lighting | Evokes suspense and drama by emphasizing shadows and high contrast. | Underexpose the shot to hide details in darkness and highlight specific features. |
| Natural Light Timing | Manipulates the emotional tone through light intensity and direction. | Photograph the same scene at dawn, midday, and dusk to contrast the results. |
| Backlighting | Adds a glowing aura or silhouette effect to the subject. | Position the subject between the camera and the light source. |
Mastering these techniques allows the photographer to move from simply documenting a scene to intentionally communicating a specific vision.
4. Identifying Residual Inquiries and Advanced Paths
A comprehensive guide must acknowledge its boundaries; ongoing research is vital as 2026 technology, such as AI-integrated workflows and authenticity metadata, evolves rapidly. While the 20 tips above provide a roadmap for mastery, several advanced paths remain for further works.
5. Final Recommendation for Further Research
Based on the provided source context, the single best source for a newcomer to continue their research is SLR Lounge’s Photography 101. This course is evaluated as the premier instructional resource due to its 6.5-hour depth and comprehensive coverage of manual modes across multiple genres. It successfully teaches the “mindset” of a photographer, facilitating a transition from beginner to intermediate levels through high production value and detailed genre breakdowns.
For those operating in the local market, Nikon Australia’s Mirrorless Guide serves as an essential supplementary resource for understanding weather-sealing and lens compatibility in harsh Australian environments.
To truly master the craft, a newcomer must now move from theory into practice by applying the 20 fundamentals in the field to build muscle memory that creates a unique visual style.