The video tutorial from Free Will Photos provides a concise yet comprehensive guide on how to manage extras ie: presets, LUTs, and textures – within ON1 Photo RAW. It is especially useful for users who have downloaded or purchased add-ons from the ON1 website but find that these extras are not automatically installed. The presenter walks through the easiest installation method, highlights common pitfalls, and demonstrates how to organize and clean up extras to maintain a streamlined workflow.
1. Introduction to Managing Extras in ON1 Photo RAW
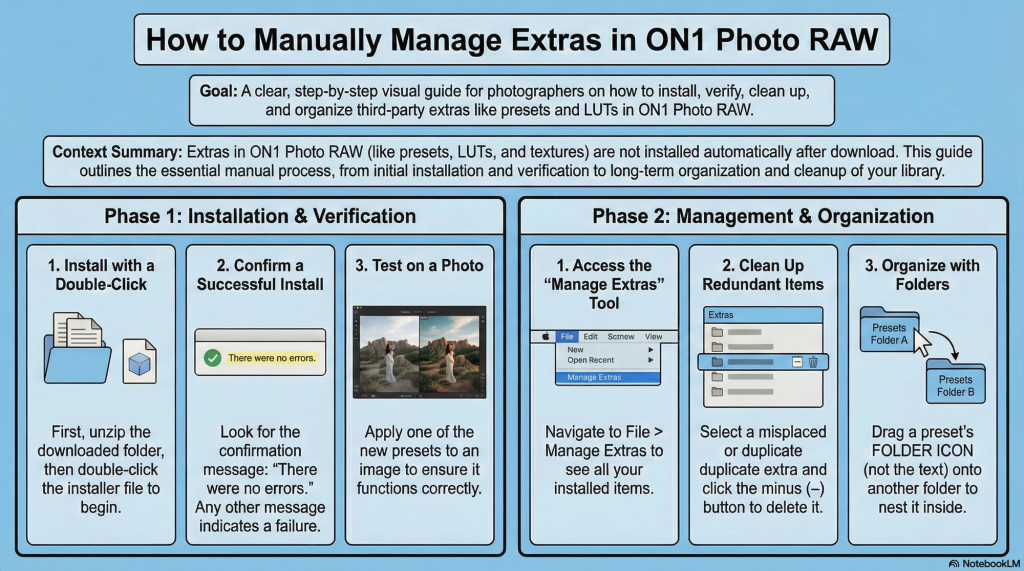
The video opens with an introduction to the topic of managing extras in ON1, targeting users who have acquired additional presets or add-ons either through purchase or bundled downloads. The presenter underscores that these extras do not install automatically upon download, which can confuse new users.
- Key Point: Extras such as presets, LUTs, and textures require manual installation inside ON1.
- Purpose: The video aims to show the simplest way to install these extras, how to troubleshoot common issues, and how to clean up your installed extras for optimal organization.
2. Installing Presets and Extras: Step-by-Step
Chris demonstrates the installation process using an example preset package called “Dramatic Portrait.” The steps are straightforward:
- Locate the downloaded folder containing the extras, which is typically zipped.
- Unzip the folder using any unzip program (compatible with both Mac and Windows).
- Inside the unzipped folder, find the installer file or preset package.
- Double-click the preset file to trigger ON1 to open it or to prompt an installation dialog if ON1 is already running.
- Confirm the installation by clicking “Yes” on the popup prompt.
- Wait a moment for ON1 to process the installation.
- Check for an error message – successful installs show “There were no errors.”
- Once confirmed, close the installer dialog.
This process will add the preset to the appropriate section inside ON1’s preset panel.
- Important: The presence of an error message means the installation failed; the user will need to troubleshoot or seek assistance.
3. Verifying and Using Installed Presets
Once installed, the new preset package appears in the preset area inside ON1. For example, the “Dramatic Portrait” preset pack shows up with its included presets accessible for use.
- Users can now select the new presets while editing photos.
- This section reassures users that the installation was successful and that the presets are ready to use.
4. Common Issues and How to Clean Up Extras
The presenter notes that sometimes extras do not install or function optimally because they are placed in the wrong category or folder within ON1. For example:
- LUTs (Look-Up Tables): These should ideally be inside the “L” (LUT) filter section but sometimes get installed as regular presets.
- Textures and Gradients: Some users may have duplicates or unwanted textures installed as presets or LUTs even though they exist in the dedicated textures folder.
To clean these up:
- Navigate to File > Manage Extras within ON1 (location of this option varies depending on whether you are in the Edit or Browse module).
- Scroll through the list of installed extras to locate unwanted or misplaced items.
- Select the extra you want to remove and click the minus (–) button.
- Confirm deletion to remove the extra from ON1’s library.
The presenter demonstrates this cleanup by removing “Golden Hour LUTs” and “Gradient Tropical Textures” that were redundant or incorrectly installed.
- Benefit: Maintaining a clean, organized preset and extras folder improves workflow and prevents confusion.
5. Understanding Icons and User-Created Presets
The presenter explains the meaning behind some visual cues in ON1’s preset library:
- Some presets show a gear icon or slider icon without a thumbnail image.
- These icons indicate presets created by the user or presets without an assigned cover image.
- The presenter mentions having a dedicated video tutorial on creating custom presets with cover images but notes it’s optional.
6. Organizing Presets into Folders
As the number of presets grows, users may find the preset panel cluttered. The video offers a simple method to organize presets by nesting them into folders:
- To move a preset pack into a folder, click and drag the folder icon (not the text) of the preset pack.
- Drop it into the desired folder (e.g., a testing or project-specific folder).
- This action nests the preset pack inside the folder, tidying the preset area.
- The presenter shows moving “Linear Raw Presets” into the “FWP Preset Testing Ground” folder.
- This drag-and-drop method mimics typical folder organization in file explorers and is intuitive.
- Outcome: A cleaner, more manageable preset panel that reduces visual clutter and improves accessibility.
Key Insights
- Manual installation of extras is necessary in ON1 Photo RAW – it’s not automatic.
- Double-clicking preset files is the easiest install method.
- Always watch for error messages during installation to ensure success.
- Use the Manage Extras menu to remove unwanted or misplaced extras.
- Organize presets using drag-and-drop folder nesting to maintain a clean workspace.
- User-created presets may lack visual thumbnails, which is normal.
- Personalized coaching and additional tutorials are available for deeper learning.
- Promo codes can save money and support content creators.
Final Thoughts
This tutorial effectively addresses a common pain point for ON1 Users – how to properly install, manage, and organize extras. The practical, clear instructions combined with tips for troubleshooting and cleaning up extras provide users with the tools to maintain a tidy and efficient editing environment. The encouragement to engage with the community and seek further training also adds value beyond the single video, fostering a supportive learning experience.