STILL FREE TO USE
Lumatic Lab Image Sculptor is an advanced web-based photo editing application.
The tool enables users to perform sophisticated colour grading and image manipulation directly within a browser by loading various file types, including standard images, LUT cinematic profiles, and tonal CSV data. The software features a comprehensive suite of adjustments such as vignette finishing, texture overlays, and light weighting, alongside professional utilities like a live histogram and zebra stripes for exposure monitoring. Users can apply pre-configured aesthetic looks for specific subjects like portraits or landscapes, while also benefiting from a robust system for undoing actions and exporting activity ledgers.
Ultimately, the code defines a high-performance environment for rendering and saving high-quality visual outputs with precise mathematical control over pixel data.
Ditch the subscriptions. Lumatic Labs Image Sculptor is a professional photo editing workflow packed into a single HTML file. It’s local-first, high-performance, and operates entirely within your browser for total creative freedom.
Takeaways
- The “Zero-Upload” Architecture. Utilizing dual pixel buffers (preview vs. full-res), the app processes data in gamma-encoded sRGB space using Rec.601 coefficients. This ensures architectural speed without server lag, keeping your high-resolution assets strictly on your local hardware for maximum privacy.
- Pro-Grade .cube LUT Export. The engine exports 33-point LUTs using trilinear interpolation for elite color precision. These are compatible with Lightroom Classic, allowing you to batch non-destructive grades across your entire professional workflow for consistent, high-end results.
- Mathematical Highlight Protection. To prevent harsh digital clipping, the engine applies a sine curve roll-off for pixels exceeding 0.85 luminance. This preserves delicate feather detail in high-key shots and provides a smooth, film-like finish often missing in web-based tools.
- “Image Sculptor is a self-contained HTML file… no installation, no internet connection required after the file is loaded.”
The Future is Local-First Editing
This tool marks a vital shift toward local-first software.
Lumatic Lab – Image Sculptor – whilst not being aimed at professional photo-editors and colourists, the app has many of the features Users need to complete their work. The app is continually being updated and more features will be added as further functionality is made available to web browsers
Lumatic Lab – Image Sculptor – is completely FREE with NO paywalls. Because it is a single-file application with no external dependencies, your security is never a trade-off.
Is the browser the new frontier for secure, professional creative privacy ?
FULL DOCUMENTATION IS AVAILABLE HERE in zip format.
But for those who want to make a Quick Start:
Go from a blank screen to a saved, polished image in five minutes.
Step 1 — Open the App
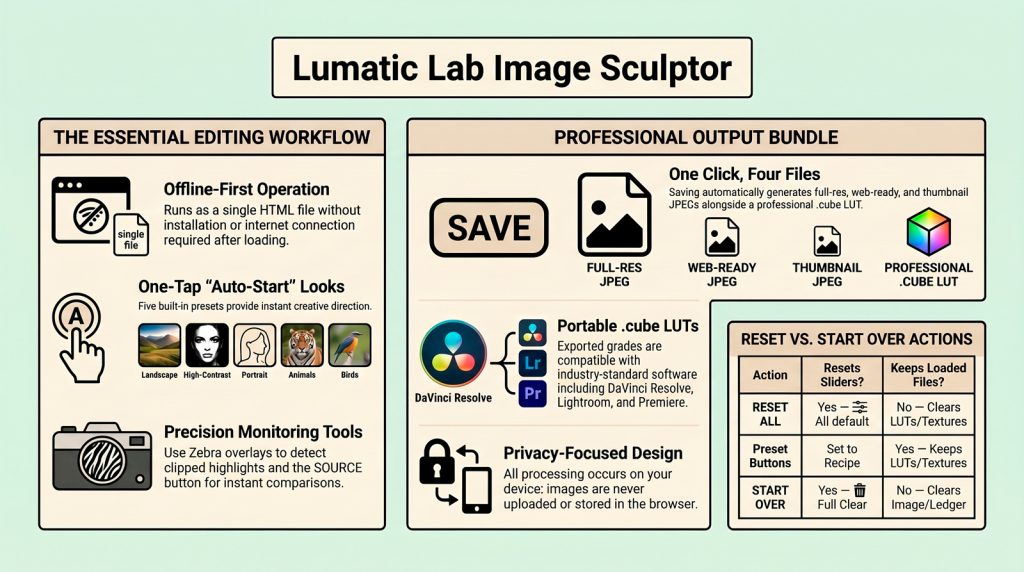
Image Sculptor is a self-contained HTML file. Open it in Google Chrome or any Chromium-based browser — no installation, no internet connection required after the file is loaded. For the best experience press F11 or use the browser’s fullscreen option before you begin.
Step 2 — Load Your Image from the practice materials (zip format)
You’ll find test images in the PRACTICE IMAGES TONES LUTS.zip file
- Drag the image file anywhere onto the app window and drop it.
- Click the LOAD [L] button in the toolbar and select your file from the browser dialog.
- Click the [ Load Image ] button in Panel 1 on the left side.
Step 3 — Choose a Starting Look (Optional)
Panel 0 (top left, highlighted in blue) contains five Auto-Start presets. These are a fast way to establish a direction, for any type of subject and quite often will achieve the desired result if just posting to social media, BUT but don’t just go for one, try them all !
Step 4 — Adjust to Taste
Work through the panels from top to bottom. Each panel has a RESET or CLEAR link to undo just that panel’s changes without affecting anything else.
| Panel | What to Do |
| 1. Colour Balance | Warm up or cool down your image using the Red/Green/Blue gain sliders. Small moves (±0.20) go a long way. |
| 2. Tonal Looks | Load a CSV preset file and tick the checkbox next to a look to apply it. Adjust the Sculpt Mix slider to control intensity. |
| 3. LUT Stack | Load one or more .cube LUT files. Tick to activate; use the per-LUT opacity slider to blend. |
| 4. Global Changes | Fine-tune exposure, contrast, vibrance, and shadow/midtone/highlight separation. |
| 5. Texture Overlay | Load a texture image and choose a blend mode. Use Blend Strength and Texture Soften to taste. |
| 6. Vignette | Use the Strength slider to darken the edges. Radius and Feather control the size and softness. |
| 7. ND Filter | Drag Filter Density up to darken the sky (top of the image) without affecting the ground. |
Step 5 — Review Your Work
Use these tools in the toolbar to check your edit before saving:
- Hold SOURCE to see the original unprocessed image for direct comparison. Release to return to your edit.
- Click ZEBRA ON to highlight blown-out highlights in red and crushed blacks in blue — useful for checking exposure.
- Watch the histogram (bottom of the left panel) — a good exposure keeps the graph away from both edges.
- Use the three coloured squares (left of toolbar) to switch the background between black, grey, and white. This helps judge tonal balance without the background influencing your eye.
Step 6 — Save Your Work
Type a filename in the pink text field (no extension needed), then click SAVE [E] or press the E key. The app will download four files automatically: Note :: it may ask your permission to download multiple files, if it does, saying yes will allow it to do so.
The APPLICATION, The QUICK START Guide, TOOL TIPs and finally the FULL USER Guide all available here.
As always, if you find any issue or would like to contribute, just use the ‘CONTACT US’ link.