
Mastering Blend Modes in Photo Editing
Blend modes determine how the pixels of an upper layer combine with those of the photograph beneath it.
Their results depend on the colours, brightness, order and opacity of both layers.
In the past, compositing different visual elements required painstaking, destructive masking techniques. However, modern blend modes have revolutionized this pipeline by utilizing complex mathematical algorithms to merge overlapping pixels based on their luminance, contrast, or colour values. By mastering these blending modes, photo editors can easily isolate and merge intricate image data without the need for manual, time-consuming selection tools.
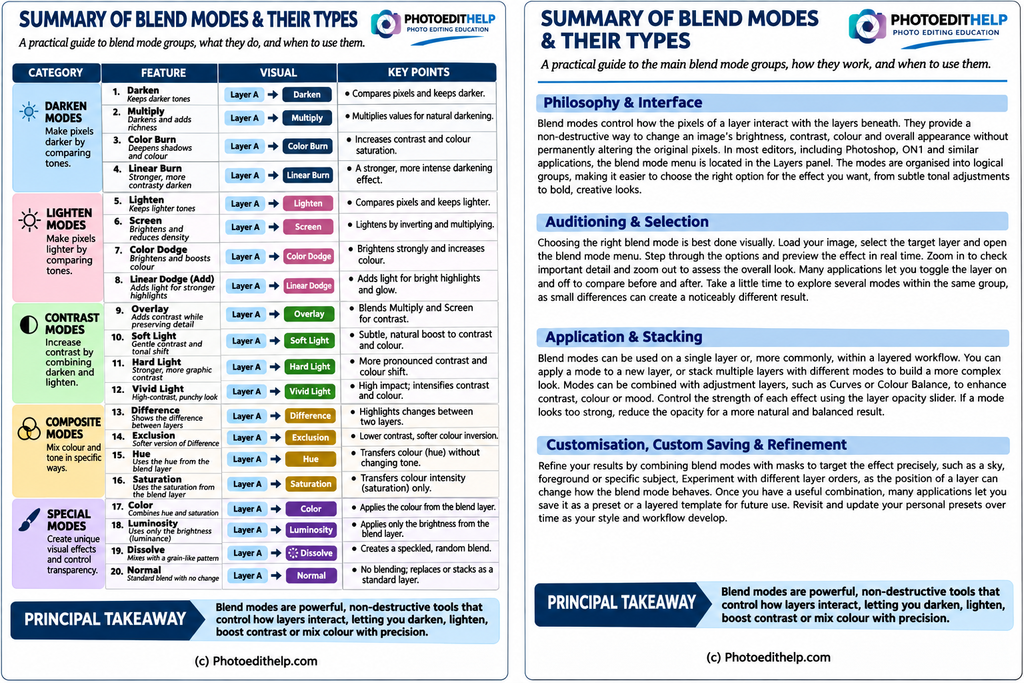
This page is available for download here. NB:: The page is ‘double width’ so best printed landscape rather than portrait.
The natural workflow of digital blend modes can be categorized into four primary functional groups, beginning with the Darken and Lighten categories. When attempting to overlay intricate dark patterns or ink details onto a lighter subject, selecting “Multiply” inside the layers panel mathematically calculates the product of the overlapping pixel colors. This effectively renders any white in the upper layer completely transparent, while naturally deepening the shadow tones. Conversely, when attempting to add atmospheric elements like lens flares, dust, or snow, selecting the “Screen” mode multiplies the inverse color values of both layers, making all dark background tones transparent and allowing only the luminous, lighter pixels to seamlessly overlap the image below.
For photo editors seeking to elevate the visual bite of flat, low-contrast images, the Contrast group offers some of the most versatile and powerful non-destructive options.
“Overlay” combines “Screen” and “Multiply” modes, treating any value brighter than 50% gray as a screen layer and anything darker than 50% gray as a multiply layer. This injects intense local contrast into the final composite without losing delicate highlights or shadow details. For more subtle, organic results, editors often opt for the more gentle “Soft Light” mode, which is particularly effective for delicate color grading, texture mapping, and portrait retouching.
Finally, the Component category allows for the precise isolation of chromatic elements from baseline exposure. Selecting “Color” applies the hue and saturation of the upper blend layer directly to the image beneath, while leaving the base layer’s luminance values entirely untouched. This allows for rich, natural tinting and creative color grading without altering the underlying highlight and shadow dynamics. In contrast, “Luminosity” applies only the brightness values of the top layer, leaving the existing hue palette intact. This enables editors to unify mismatched exposure levels and add rich dimensional depth without disturbing the native colors of their scene.
Selecting the correct blend mode group is the ultimate shortcut in digital compositing: identify your target tonality – whether to darken, lighten, adjust contrast, or colorize – and always adjust layer opacity to achieve seamless results.
However there are 8 unique blend modes (Colour Burn, Linear Burn, Colour Dodge, Linear Dodge, Vivid Light, Linear Light, Hard Mix, and Difference) that calculate their mathematical interactions on a non-linear scale when adjusting the Fill slider rather than Opacity. This enables smoother colour transitions, natural lighting effects, and superior non-destructive image blending.
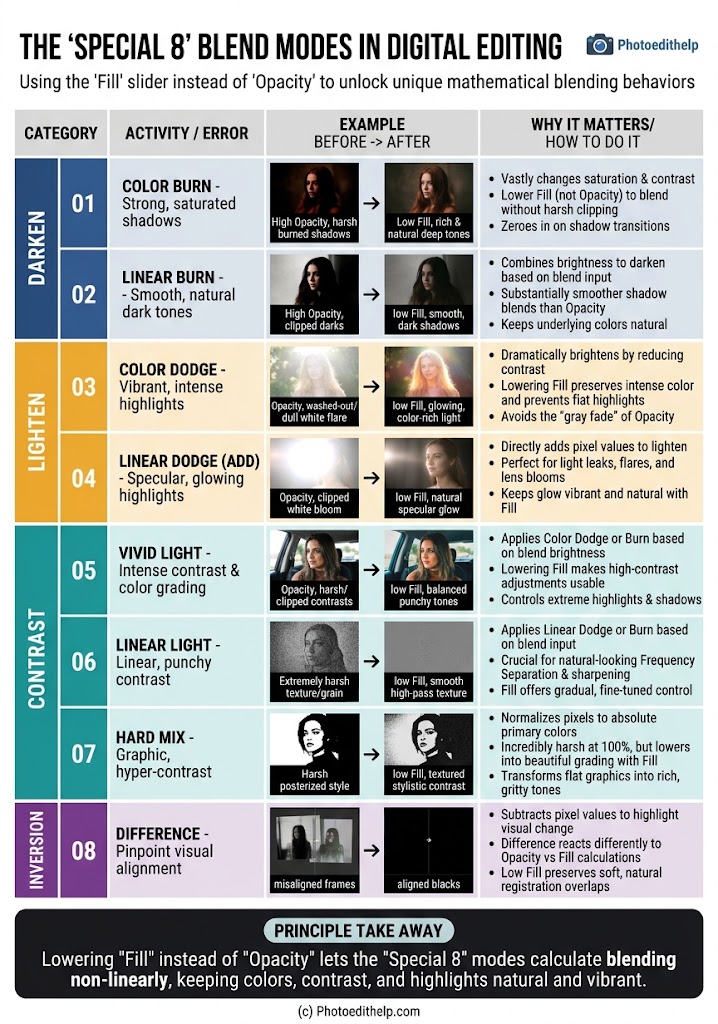
This image is available here.
(c) Photoedithelp.com