The Lumatic Lab Style Matcher is a sophisticated image processing utility designed for tonal and colour distribution transfers. It is a tonal remapper and should not be confused a basic pixel replacement or colour overlays, so often shown as ‘night scope’ colouring, this engine employs histogram matching and cumulative distribution function mapping to align the “tonal DNA” of a reference style with a target photograph while preserving original details.
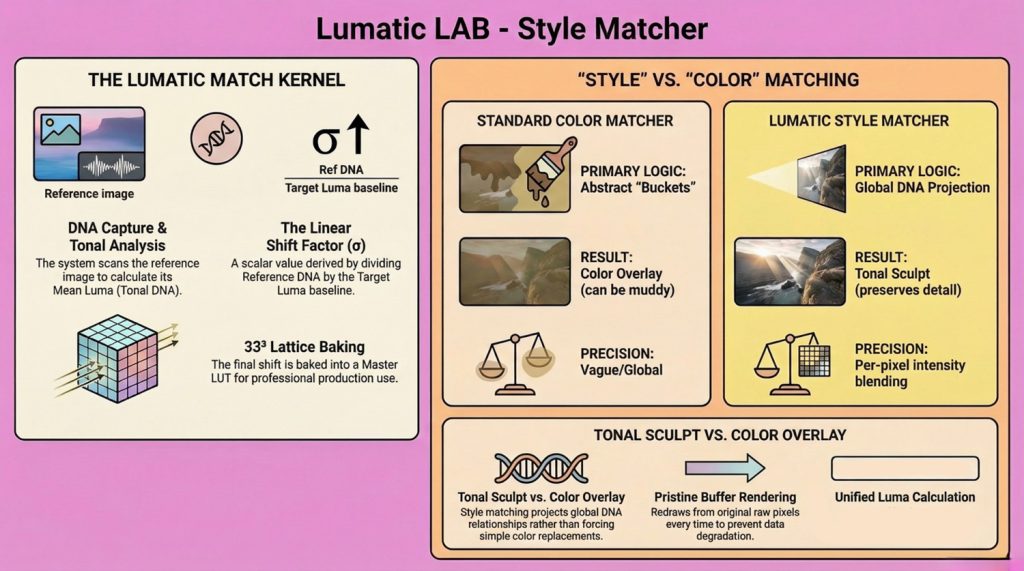
The difference between a standard Color Matcher and the Lumatic Lab Style Matcher lies in their fundamental approach to modifying an image’s underlying structure:
- Primary Goal: A standard Color Matcher attempts to force “Color A to become Color B,” whereas the Style Matcher focuses on “Projecting Tonal Relationships”.
- Logic and Precision: Standard color matchers rely on abstract tonal “buckets” (like Shadows, Midtones, and Highlights) to apply a vague, global “Look” over an image. The Style Matcher instead uses “Global DNA Projection” with per-pixel intensity blending to integrate a “Tonal Sculpt” directly into the image’s pixels.
- Handling of Luminance: Standard color matching often ignores an image’s underlying luminance, which can result in “muddy” highlights or “crushed” shadows.
- Tonal Re-mapping vs. Replacement: Ultimately, Style Matching is about re-mapping the distribution of light and color, rather than performing a pixel-for-pixel replacement. It acts like a “Color Grade” that preserves an image’s detail, as opposed to a “Color Overlay” that destroys it.
What You Need
- A modern web browser (Chrome, Edge, Firefox, etc.)
- Two types of images: Target image – the photo you want to modify; Style image(s) – photo(s) whose colour look you want to copy
NB :: The page works locally in your browser. Images are not uploaded to the internet.
Step 1 — Load the Photo You Want to Change
- Look for the panel “Assets for Modification.” Drag your photo into the box labeled “Drop Image to be modified here.” Alternatively, click the box and select a file from your computer. Your image for modification will appear in the centre preview area
Step 2 — Add Style Images
- In the panel “Style Sources (Stack)”, drag one or more images into the box labeled “Drop Style Image(s) here.” Each style image will appear in a list below the box.
- Click any style name in the list to apply its colour style to your photo it will update automatically.
Step 3 — Adjust the Style Strength
Use the Style Intensity slider.
- 100% → full style from the source ; 50% → softer blend between original and style; 0% → original image only. Move the slider until the result looks right.
Step 4 — Name Your Export
In Identity Management:
- Type a name in the Export Name field. This will become the filename when the image is saved.
Step 5 — Save Your Edited Image
- Click Save Production Assets.
- Two files will download automatically: A Full-size edited image (.jpg) and a Small preview image (200px)
Both files use the export name you entered.
Tips for Best Results
- Choose style images with clear colour mood (sunset, cool tones, film look).
- Try multiple style images to compare looks quickly.
- Use lower intensity (40–70%) for natural results.
Common Issues
| Issue | Likely Cause | Fix |
|---|---|---|
| Nothing appears in preview | Target image not loaded | Load the main image first |
| Style doesn’t change | No style image selected | Click one in the stack |
| Export button does nothing | No style selected | Select a style image |
An abbreviated ‘Quick Start Guide’ is available here in PDF format.