In his video, Anthony Morganti introduces and demonstrates Topaz Labs Sharpen integrated into Photoshop. This tool uses Adobe’s generative AI technology but requires premium generative credits to operate.
Anthony explains how the tool works, its credit cost based on image size, practical usage tips, and compares it with traditional sharpening techniques like the highpass filter. He also shares insights on how to selectively sharpen subjects within images to maintain control over the effect.
1. Introduction: New Sharpening Tool in Photoshop
Anthony starts by announcing a new sharpening feature in Photoshop branded as Topaz Labs Sharpen. Unlike traditional plugins, this tool is embedded directly in Photoshop, eliminating the need for a separate purchase or installation. However, it is not free – it consumes premium generative credits from Adobe’s system, which are a form of paid AI processing credits.
He references a link in the video description directing users to a website where they can check the credit costs for different AI features, including Topaz Labs sharpen, gigapixel, and denoise tools.
2. Understanding Generative Credit Costs and Image Size
The tool’s credit consumption depends on the image’s megapixel count:
- Images up to 25 megapixels cost 10 credits per sharpening.
- Images between 25 and 56 megapixels cost 20 credits per sharpening.
Anthony explains how to calculate an image’s size in megapixels by multiplying the pixel width and height (dimensions shown in Photoshop’s lower left corner) and dividing by one million. Using an example image with dimensions 5568×3712 pixels, he calculates the image size as approximately 20.66 megapixels, meaning sharpening it will cost 10 credits.
3. How to Use Topaz Labs Sharpen in Photoshop
The sharpening tool is found under the Filter > AI Sharpen menu. Since it is best practice to work non-destructively in Photoshop, Anthony advises duplicating the background layer first (Command/Control + J) before applying the filter.
Once applied, a dialog appears noting that the sharpening uses Topaz Labs technology with premium credits. The tool is designed to recover natural detail, sharpness, and reduce blur and shake. Importantly, it processes the image locally on your computer rather than sending it to Adobe’s servers, ensuring privacy.
The AI attempts to detect the main subject in the photo and sharpen it selectively, though this is a simplified version compared to the full Topaz Labs Sharpen plugin, which offers multiple models, masking options, and fine controls. The Photoshop version operates as a mostly one-click solution focusing on the subject.
4. Demonstrations: Results on Various Images
First Example: Bird Image
The tool is applied to a crisp bird photo. Anthony provides before-and-after comparisons, showing visible sharpening on the bird subject without zooming in initially. Zooming in confirms the bird is noticeably sharper after processing.
Second Example: Ocelot at Zoo (Challenging Image)
A more difficult case involves a blurry photo of an ocelot taken through glass in low light. After duplicating the layer and applying AI Sharpen, the result is sharper but unnatural and unrealistic-looking. Anthony is disappointed and notes that the sharpening was subpar and the 10 credits spent on this image were essentially wasted.
Third Example: Woodpecker and Tree
In a photo where the woodpecker and a tree are at similar focal planes, the AI sharpened both the bird and the background tree. While this made the entire image sharper, it did not isolate the subject as desired. Anthony highlights this as a potential downside when selective sharpening is important.
5. Using Masks to Control Sharpening Application
Anthony shares a practical tip to regain control: after sharpening the whole duplicated layer, you can add a layer mask to selectively apply the effect. By selecting the subject (via Select > Subject), you can create a mask that restricts sharpening only to the main subject.
Painting black on the mask removes sharpening from unwanted areas (like the tree), while white reveals the sharpening effect. This method allows users to mitigate the AI sharpen’s tendency to affect unintended parts of the image.
6. Alternative Sharpening Method: Highpass Filter
If users want to avoid using generative credits or prefer more control, Anthony suggests the Highpass filter method:
- Duplicate the background layer.
- Apply Filter > Other > Highpass.
- Adjust the slider until only edges are visible (not too subtle, not too exaggerated).
- Change the duplicated layer’s blend mode to Overlay to create the sharpening effect.
He demonstrates this on an image of a bird, showing a before-and-after where the highpass filter yields a crisp, natural sharpening without using any credits. To apply sharpening selectively with this method, the same subject selection and masking technique can be used as with Topaz Sharpen:
- Select the subject on the original background layer.
- Switch to the sharpened layer and add a mask.
- This confines sharpening to the subject only.
Anthony personally prefers the highpass filter’s results to the AI sharpen in terms of realism and control, though he acknowledges this is subjective.
Key Insights
- Topaz Labs Sharpen is integrated into Photoshop and uses premium generative credits,it ids NOT free.
- Credit cost depends on image megapixels (10 or 20 credits per use).
- The tool works locally on your computer and attempts to sharpen only the subject.
- It is a simplified, one-click AI sharpen compared to the full Topaz Labs plugin.
- Results vary: good on simple, clear subjects; less natural or effective on complex or blurry images.
- Layer masks combined with subject selection allow for refined control over sharpening application.
- Traditional Highpass filter sharpening remains a valuable, credit-free alternative.
- Personal preference may favor highpass sharpen for realism and control despite the AI tool’s convenience.
FAQ
Q1: Does Topaz Labs Sharpen send images to Adobe servers?
No, it processes images locally on your computer.
Q2: How many generative credits does sharpening cost?
10 credits for images up to 25 megapixels; 20 credits for images between 25 and 56 megapixels.
Q3: Can I control which parts of the image are sharpened?
Yes. Use Photoshop’s Select Subject and add a layer mask on the sharpened layer to restrict sharpening to the subject.
Q4: Is Topaz Labs Sharpen better than traditional sharpening methods?
It depends. It offers a quick, AI-driven one-click sharpen but lacks control and sometimes produces unrealistic results. Highpass filtering offers more manual control and no credit cost.
Q5: How do I find my image’s megapixels?
Multiply the image width and height in pixels (shown in Photoshop’s document dimensions), then divide by one million.
7. Final Thoughts and Recommendations
Anthony concludes by emphasizing the credit cost and limited control of Topaz Labs Sharpen within Photoshop. He encourages viewers to weigh the value of using premium credits for this one-click sharpening against traditional methods like highpass that offer more user control and no credit cost.
He reminds viewers that the link to the credit pricing and details is available in the video description and hopes this overview helps users decide if they want to use the new AI sharpening tool or not.
This comprehensive summary aims to provide a clear understanding of Photoshop’s new Topaz Labs Sharpen tool, its usage, costs, pros and cons, and alternative sharpening methods.
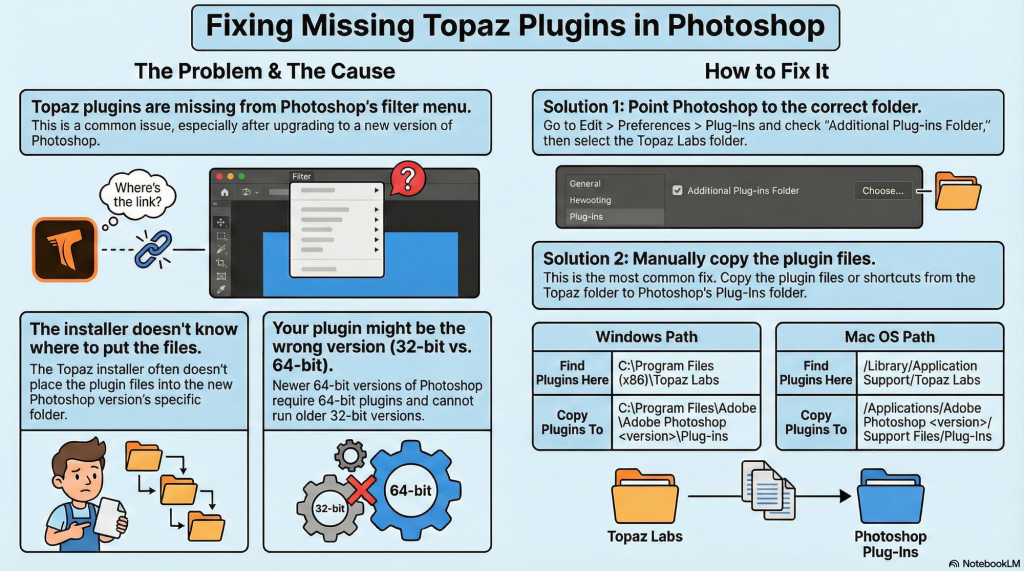
Occasionally, after installation, Plugins may be ‘missing’. The following gives a high-level view of how to fix it.