
Blend-If will shortly be integrated into our BlendLAB educational app.
Summary
- Blend-If sliders are a non-destructive, tone-based blending engine: instead of erasing pixels or painting a mask, they hide and reveal pixels automatically based on brightness (or a chosen colour channel), controlled by two slider bars — “This Layer” (the active layer) and “Underlying Layer” (everything below it) – each with a black and a white handle.
- The single most valuable skill is feathering: hold Alt/Option and click a handle to split it in two, then drag the halves apart so the transition between visible and hidden pixels becomes a smooth gradient rather than a hard, jagged cut-out.
- Uses span seven practical categories – Compositing, Background Removal, Overlays & Textures, Tone & Exposure, Colour Grading, Retouching, and Creative Effects – from sky replacement and knocking out black/white backgrounds to split-toning, selective sharpening, dodging & burning, and dreamy glow effects.
- Links scattered throughout – those point to external videos or articles we genuinely think are worth your time. They cover Blend-If from different angles, and we’ve included them because they add real, practical value beyond what we could fit here.
- Read this Important Copyright and Disclaimer Notice if you have not read it before.
Key Findings
- Blend-If lives at the bottom of the Blending Options / Layer Style dialog (opened by double-clicking beside a layer, or via the fx icon). It works on any layer type, including adjustment layers, text layers, and smart objects.
- The mechanism is a 0–255 luminance scale. As Adobe’s own documentation puts it, you “set the brightness range of the blended pixels — measured on a scale from 0 (black) to 255 (white).” “This Layer” black handle right = hide the dark pixels of the active layer; white handle left = hide its bright pixels (Adobe’s example: “if you drag the white slider to 235, pixels with brightness values higher than 235 will remain unblended and will be excluded from the final image”). “Underlying Layer” does the reverse – it forces the tones of the layers below to ‘punch back’ through the active layer. PhotoshopCAFE
- It is completely non-destructive and “live”: pixels are hidden, not deleted, and because the effect is tonal, it re-computes automatically as the underlying pixels change – so a Blend-If sharpening or noise layer adapts as you edit the layers beneath it.
- A dropdown lets you switch the reference from overall brightness (“Gray”) to an individual Red, Green, or Blue channel, which is the key to fast sky replacement and per-colour control.
- Blend-If adds virtually nothing to file size — a decisive advantage over luminosity masks. As educator Greg Benz notes, “while luminosity masks are grayscale images which can increase the size of your file by as much as 33%, BlendIf has absolutely no impact on the file size. Zero.” But it is purely tone/colour based and cannot distinguish objects. As PHLEARN warns, “Blend If reads luminosity and nothing else, so it cannot distinguish objects that happen to share a brightness. Push it hard enough to remove one and it will eat the other” – so mid-toned subjects often need a supporting layer mask.
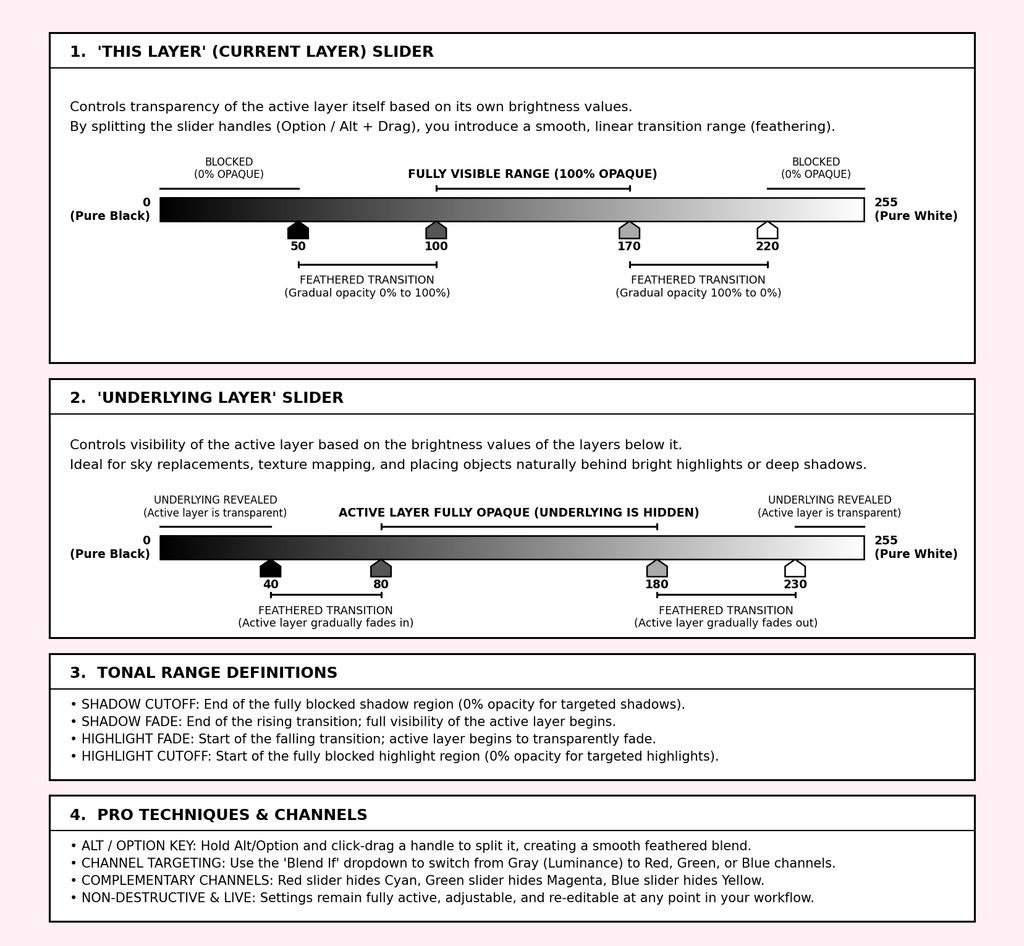
A full size version of this image for download can be found here.
Details
1. How Blend-If Works (the technical foundation)
Where it lives. Double-click the empty space beside a layer (or click the fx icon and choose Blending Options) to open the Layer Style dialog. The two Blend-If slider bars sit at the bottom. Note: a locked Background layer must be converted to a normal layer first. SitePoint
Two bars, four handles. Both bars run from black (0) on the left to white (255) on the right. Improve Photography
- This Layer controls the visibility of the currently selected layer. Drag the black handle right to drop out (hide) the layer’s darkest pixels; drag the white handle left to drop out its brightest pixels. PhotoshopCAFE
- Underlying Layer controls how the tones of the layers beneath show through the active layer. Drag its black handle right to force the dark pixels below to punch up through the top layer; drag its white handle left to force the bright pixels below through.
Feather by splitting. By default the cut-off is abrupt and produces hard, jagged edges. Hold Alt (Windows) / Option (Mac) and click a handle to split it into two halves. The gap between the halves becomes the transition zone: pixels outside are fully transparent, pixels inside the gap fade gradually, and pixels beyond are fully opaque. The wider the gap, the smoother and more natural the blend.
Tone-based, not shape-based. Blend-If decides what to show purely from brightness (or a colour channel), so it cannot tell a dark jacket from a dark hillside. PHLEARN That is its speed and its limitation.
Per-channel mode. Switch the dropdown from “Gray” to Red, Green, or Blue and the sliders reference that channel’s brightness instead of overall luminance. In the chosen channel, the white handle hides areas where that colour is present, the black handle hides areas where it is absent. photoshoptrainingchannel
Non-destructive and live. Nothing is erased – pixels are only hidden – and the settings can be re-opened and re-adjusted at any time. Photoshop Training Channel Because the blend is tonal, it updates automatically as underlying tones change.
Caveats
- Tone-blind to objects. Blend-If cannot distinguish a subject from its surroundings if they share brightness; expect to finish mid-toned blends with a mask (e.g. Select Subject → load as a mask). PHLEARN
- Per-channel fringe-fixing is niche. While the Advanced Blending sliders can suppress a black/white matte fringe, there is no widely-documented, authoritative technique for using a coloured-channel Blend-If to remove a coloured edge fringe/spill; established retouchers instead use edge-contraction (Minimum filter), Decontaminate Colours, Photoshop Tutorial or a Hue-mode clipping layer for that job. PHLEARN Present per-channel fringe control as a supplementary trick, not a primary method.
- Split-handle values don’t survive flattening cleanly. To “bake” a Blend-If result into a real transparency (e.g. to export a PNG with a knocked-out background), you generally merge the Blend-If layer onto a blank layer below it.
- Some professionals are lukewarm on it. A minority of experienced editors find Blend-If results unsatisfying versus masks. Educator Damien Symonds is blunt: “the truth is there’s not much practical day-to-day use for these sliders. In fact, you might only need them once or twice a year.” Treat it as one tool among several, not a universal solution.
- Terminology varies. Some educators call these the “Luminance Exclusion” or “make-see-through-if” sliders – as Damien Symonds puts it, “I understand why they’ve named it the ‘Blend If’ function, but it’s easier to think of it as the ‘Make see-through if’ function” – and note that “Blend If” strictly refers only to the channel dropdown above them. The concept is identical across editors even where the label differs.
- Live/tonal behaviour cuts both ways. Because the effect re-computes as underlying tones change, edits you make lower in the stack can subtly alter a Blend-If blend above them – usually helpful, occasionally surprising.
Bottom line
Blend If = brightness-based masking + soft transitions, all non-destructively, without layer masks.