
We looked across the web for the most useful guides on Blend-If, and pulled together the best insights we could find – all in one place, to give you a clear overview of what it can actually do, without any of the fluff.
At its heart, Blend-If is a non-destructive, tone-based blending tool. Think of it as a smart alternative to erasing or mask painting: instead of manually removing pixels, it automatically shows or hides them based on brightness – or a specific colour channel if you prefer. All of that is controlled by two simple slider bars: “This Layer” for the active layer, and “Underlying Layer” for everything below it.
You’ll also notice links scattered throughout – those point to external videos or articles we genuinely think are worth your time. They cover Blend-If from different angles, and we’ve included them because they add real, practical value beyond what we could fit here.
Read this Important Copyright and Disclaimer Notice if you have not read it before.
CATEGORY A — Compositing
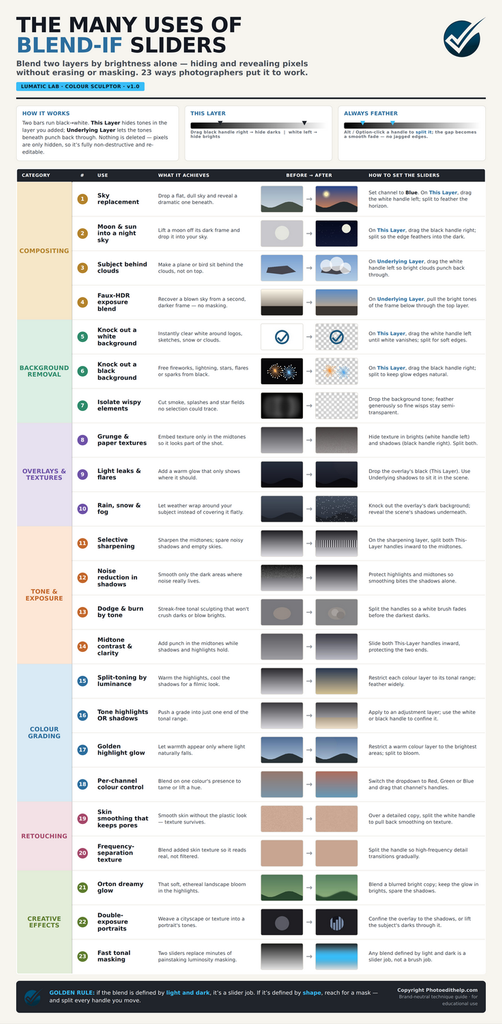
A 2 page pdf version of the above graphic is available here.
CATEGORY A – Compositing
1. Sky replacement via the Blue channel. Place your original photo on top and the new sky beneath. Set the Blend-If dropdown to Blue, then on This Layer drag the white handle left; the bright-in-blue sky drops away, revealing the dramatic sky below. photoshoptrainingchannel Split the handle to feather the horizon. Because the tool hides anything bright in the blue channel (bridges, ice, snow), bring those back with a duplicate layer. adobe
2. Compositing a moon or sun into a night sky. Put the moon photo (usually on a dark background) above the sky. On This Layer, drag the black handle right to drop out the dark surround, then split it so the moon’s edge feathers seamlessly into the sky. photoshoptrainingchannel
3. Placing a subject/jet behind clouds. With a subject layer above a cloud layer, use
the Underlying Layer white handle, dragging it left so the bright clouds punch back up in front of the subject – the jet then appears to fly behind the clouds. photoshoptrainingchannel Split for realism.
4. Faux-HDR / exposure blending without masking. Stack a differently-exposed frame on top. Use the Underlying Layer sliders to let the correctly-exposed tones of the frame below show through e.g. recover a blown sky by letting the darker exposure blend into the bright areas. Fast, and best on scenes with a flat horizon (otherwise dark edging appears). PHLEARN
5. Matching a subject to a new background (tonal integration). After dropping a subject into a scene, a Blend-If pass helps the subject’s shadows pick up the background’s tones so it reads as belonging in the scene, rather than looking pasted on. Combine with a mask for mid-toned areas.
6. Time-blending (blue hour + night sky). Blend just the lights/stars from a later exposure into a base frame by dropping out the darks of the top layer – a common way to combine a sunset with a twilight or Milky-Way frame. Mibreit Photo
CATEGORY B – Background Removal (knocking out black or white)
7. Remove a white background. On This Layer, drag the white handle left until the white surround disappears (the checkerboard/transparency shows through). SitePoint Ideal for logos, sketches, snow, clouds, and light textures. Split to keep edges soft.
8. Remove a black background. On This Layer, drag the black handle right to drop out the black surround. Perfect for fireworks, lightning, stars, lens flares, sparks, smoke, and water splashes shot against black.
9. Isolate fine, wispy elements. Because it works on tone, Blend-If handles hair-fine or semi-transparent edges (smoke, splashes, fireworks trails, star fields) far better and faster than a hand-drawn selection would.
CATEGORY C – Overlays & Textures
10. Grunge / paper / concrete textures in only highlights or shadows. Place the texture above the photo, choose a blend mode (Multiply/Overlay/Soft Light), then on This Layer drag the white handle left to hide the texture in the brights and the black handle right to protect the shadows – leaving texture only in the midtones so it looks embedded, not stuck on.
11. Light leaks, flares & bokeh overlays. These come on black backgrounds; drop the black out (This Layer, black handle right, or pair with Screen blend mode) so only the glow remains. Use the Underlying Layer black handle to let the subject’s shadows show back through so the bokeh sits in the scene. PHLEARN
12. Rain, snow, fog & particle overlays. Same principle – knock out the dark background of the overlay, then use the Underlying Layer sliders to reveal the shadows of the scene below, so falling snow or mist wraps around the subject naturally instead of covering it flatly.
13. Blending stock overlays generally. Any bright-on-black or dark-on-white stock element (dust, flares, cracks, foliage) can be dropped in tonally in seconds.
CATEGORY D – Tone & Exposure
14. Selective sharpening by tone. Put sharpening on its own layer (e.g. a High Pass), then use Blend-If to restrict it – typically keeping sharpening out of the noisy shadows and featureless bright skies, and concentrating it in the mid-tones. Always split the handles. Because it’s live, the sharpening adapts as underlying tones change.
15. Noise reduction only in the shadows. Noise lives mostly in the darks; put noise reduction on a layer and use Blend-If to protect the highlights and midtones so smoothing hits only the shadows – preserving mid-tone detail.
16. Dodging & burning limited to tone. On a dodge/burn layer, Blend-If feathers the effect so a white brush doesn’t blow out the darkest darks and a burn doesn’t crush the bights – giving streak-free, natural tonal sculpting.
17. Contrast/clarity limited to midtones. Slide both This-Layer handles inward (protecting shadows and highlights) so a contrast or clarity adjustment bites only in the midtones.
18. Recovering/protecting highlights and shadows when compositing. Use Blend-If to stop a composited element from destroying delicate highlight or shadow detail in the layers below. PHLEARN
CATEGORY E – Colour Grading
19. Split-toning by luminance. Apply a colour (solid colour or gradient map layer) and use Blend-If to confine it — e.g. warm tone into the highlights, cool tone into the shadows – by restricting each colour layer to the relevant tonal range. Feather generously for a filmic look.
20. Tone only the shadows OR only the highlights. Because Blend-If can be applied to adjustment layers, a colour-balance or solid-colour adjustment can be pushed into just the shadows (black handle) or just the highlights (white handle) – far more precise targeting than a Colour Balance layer’s own shadow/highlight zones.
21. Colour glow in the highlights (sun-glow). Paint or gradient a warm colour, then restrict it to the brightest areas so a golden glow appears only where light naturally falls (e.g. a sun-lit sky). Bwill Creative
22. Protecting saturated colours / per-channel fixes. Using the Red/Green/Blue channel modes lets you blend based on a single colour’s presence – useful for confining a grade to certain colours, or for cleaning up along composite edges (the Advanced Blending sliders can suppress a black or white matte fringe left after a cut-out). Adobe
CATEGORY F – Retouching
23. Skin smoothing that protects tone. Stack a smoothed copy over a more-detailed copy, then use This-Layer’s white handle (split) to pull back smoothing where you want to keep freckle/pore detail – smooth skin while preserving texture where it matters. Remini
24. Frequency-separation-style texture control. On a duplicated high-frequency (texture) layer, split the Blend-If handle so the added texture/sharpness transitions gradually and reads like real skin rather than a filter – and back off further with layer opacity. Fstoppers
CATEGORY G – Creative Effects
25. Orton effect / dreamy glow. Blend a blurred, brightened copy over the sharp original and use Blend-If to keep the glow blooming in the highlights while protecting the shadows from muddiness – the classic soft, ethereal landscape look.
26. Double-exposure portraits into textures. Set a texture/cityscape over a portrait (Lighten or Multiply), then use This-Layer’s white handle (split) to confine the overlay to the shadows/darker tones PhotoshopCAFE – or use the Underlying Layer black handle to bring the subject’s own shadows back up through the texture, embedding the two images into one another. photoshoptrainingchannel
27. Speeding up complex masking. For any blend defined by light-and-dark tones (textures, skies, exposure blends, glows), Blend-If replaces minutes of painstaking masking with two sliders – reserving hand-masking for blends defined by shapes rather than tones.
A 2 page pdf document summarising the above is available here.
Blend-If will shortly be integrated into our BlendLAB educational app.