
A Guide to Non-Destructive Image Editing & Tonal Control
Adobe Photoshop’s adjustment suite is the bedrock of digital photo editing, serving as the essential toolkit for refining image tone, colour, and creative styling. The cornerstone of professional photo editing is non-destructive workflow design, achieved principally through Adjustment Layers.
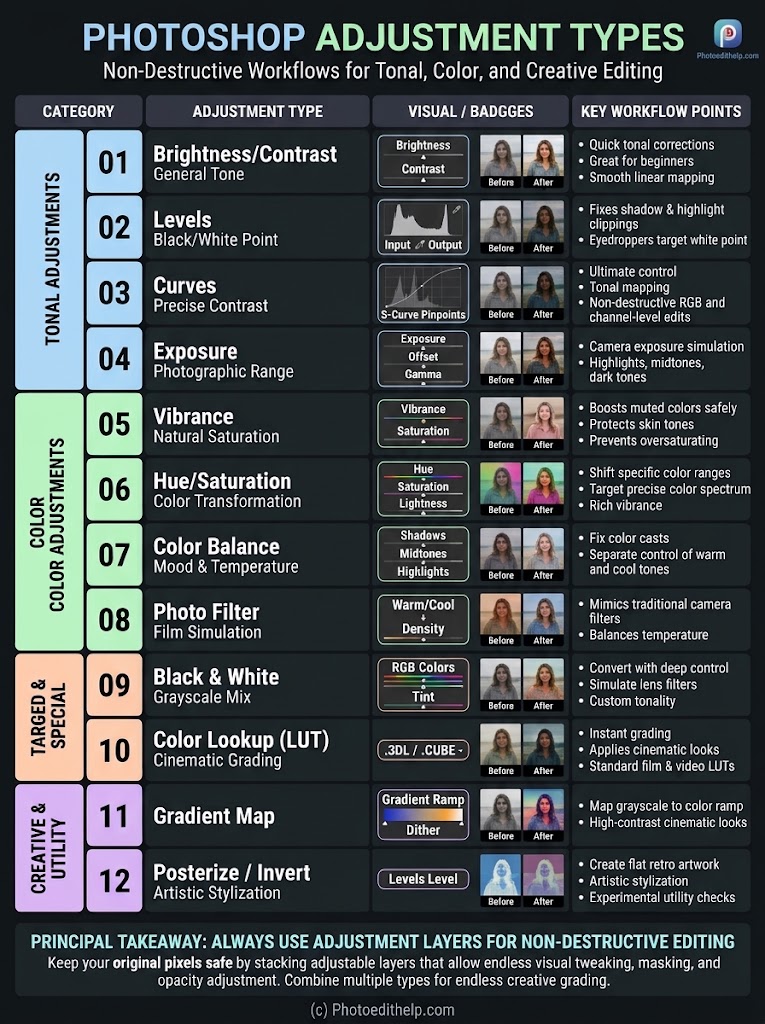
Download the graphic here (JPG).
Working through the Layers panel or the Adjustments panel allows editors to isolate modifications entirely from the original image data. Operating on separate, modular levels, these adjustment types perform complex pixel transformations above your background pixels without baking changes permanently into the image. This non-destructive framework grants users the freedom to toggle visibility, scale back opacity, and apply custom masks to target precise zones at any point in the post-processing phase.
Mastering this environment begins with basic Tonal Adjustments, which address an image’s luminosity and exposure range. For simple, linear exposure changes, the Brightness/Contrast adjustment is a straightforward starting point. However, more nuanced control is found in Levels and Curves. Levels provides an active histogram to pinpoint black, midtone, and white thresholds, allowing editors to resolve clipped shadows and highlights swiftly. Curves offers unparalleled precision by letting users map pinpoint adjustments across a targeted 256-level grid, creating highly specific contrast curves and S-curve patterns that preserve detail. For simulating traditional photographic exposure, the Exposure adjustment enables subtle calibration of photographic highlights, offset, and gamma.
Transitioning to Color Adjustments, editors can manipulate color intensity, balance, and mood. The Vibrance adjustment operates intelligently, elevating muted tones without oversaturating already vibrant areas—making it particularly protective of natural skin tones. Conversely, Hue/Saturation is the premier tool for sweeping color transformations, enabling editors to isolate, shift, or enrich specific color bands. To address overall color temperature or remove unsightly color casts, Color Balance allows targeted adjustments to the warmth or coolness of shadows, midtones, and highlights independently. For a faster, analog look, the Photo Filter adjustment simulates optical camera lens filters to naturally re-balance or warm the entire photo with adjustable density.
Finally, Targeted, Creative, and Special effects provide options for stylization and utility checks. Black & White adjustments go beyond basic desaturation, allowing editors to manipulate the grayscale conversion by adjusting the luminance of original color channels. Color Lookup (LUT) adjustments introduce cinematic color grading by instantly applying preset files. On the creative end, the Gradient Map maps grayscale values onto a multi-color spectrum, creating stylized looks, while Posterize and Invert are valuable artistic or image diagnostic utility tools. Each adjustment plays an interconnected, non-destructive role in creating professional-grade imagery.
PRINCIPAL TAKEAWAY: ALWAYS USE ADJUSTMENT LAYERS FOR NON-DESTRUCTIVE EDITING
Keep your original pixels safe by stacking adjustable layers that allow endless visual tweaking, masking, and opacity adjustment. Combine multiple types for endless creative grading.
(c) Photoedithelp.com