
Implementing Lightroom Classic 16.0 Advanced Features
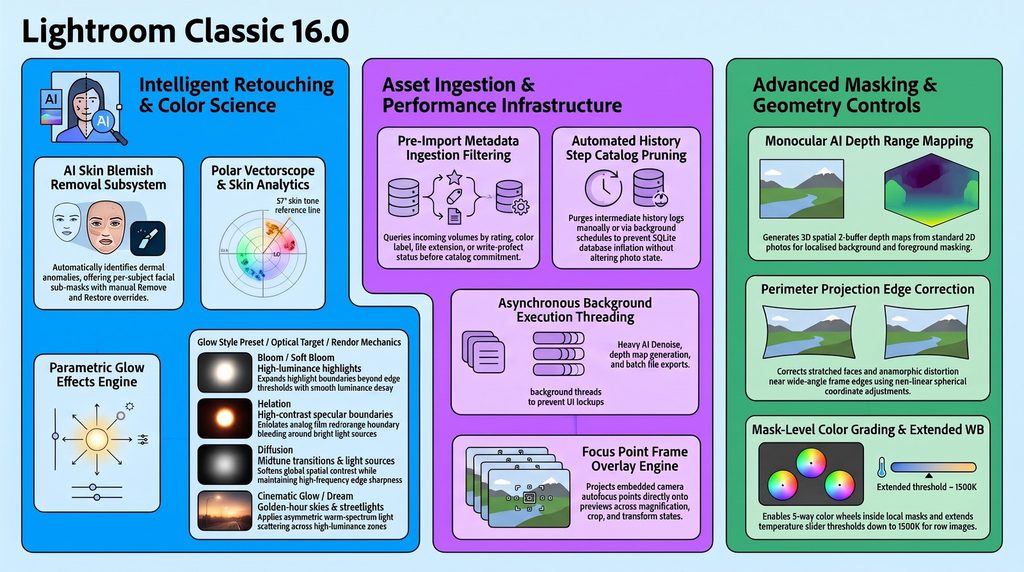
Adobe Lightroom Classic 16.0 introduces some major structural evolution in color science, spatial masking, geometric correction, and multi-threaded computing. This guide details the step-by-step technical workflows and underlying processing mechanics for the four core capabilities. We also have a PDF for Download for a more detailed idea of the direction for Lightroom and the developments introduced the release of V 16.0
1. Precision Color Balancing with the Polar Vectorscope
The Vectorscope shifts chromatic evaluation from standard linear RGB histograms into a continuous polar coordinate system. Hue is plotted along the angular axis (0° to 360°), while saturation is measured radially outward from the achromatic centroid (where pure whites, grays, and blacks aggregate).
                     0° (Red Target / Top)
                               │
            Yellow             │             Magenta
                  \            │            /
                   \           │           /
  270° (Cyan) ──────────────── Centroid ──────────────── 90° (Blue Target)
                   /           │           \
              Green            │            Cyan
                               │
                       180° (Cyan/Blue)

       [Skin Tone Reference Axis: ~57° Polar Vector]
Step-by-Step Workflow:
- Enable the Vectorscope: Navigate to the Develop module and locate the Histogram panel header. Toggle the display view from standard RGB Parade to Vectorscope.
- Select the Target Color Space:
- Click the panel settings to switch between sRGB, Adobe RGB, Display P3, Rec. 2020, or ProPhoto.
- Best Practice: Use Rec. 2020 or ProPhoto when editing high-dynamic-range (HDR) raw captures to prevent artificial boundary clipping in high-saturation colors.
- Configure Graph Orientation:
- Choose Standard Mode (Red targeted at 0° at the top) for traditional photographic color standards.
- Select Right-Origin Mode (90° clockwise rotation) if matching the workspace layout of dedicated video grading suites.
- Align Subject Skin Tones:
- Inspect the skin tone trace along the dedicated Skin Tone reference line positioned at approximately 57°.
- If skin pixels skew toward Yellow (greenish jaundice cast) or Magenta (red flush), open Point Color or the White Balance panel.
- Adjust the Variance slider in Point Color to constrain hue tolerance, nudging chromaticity until the trace aligns symmetrically along the 57° axis. For extreme tungsten casts, raw Temperature can now be pushed down to 1500K (or -150 on non-raw files).
2. Generating Monocular AI Depth Maps for Spatial Isolation
Rather than relying on embedded dual-pixel or LiDAR metadata, version 16.0 uses a neural monocular depth estimation model. The model scans 2D pixel fields for defocus gradient decay, atmospheric perspective, relative spatial scale, and micro-contrast falloff to synthesize a 3D Z-buffer depth map.
Step-by-Step Workflow:
- Initialize the Mask: In the Develop module, open the Masking panel (or press
M) and select Depth Range. - Compute the Scene Depth:
- Lightroom Classic scans the 2D capture and constructs the neural depth buffer.
- The preview overlay maps the computed depth across a near-to-far continuum.
- Define the Depth Slice:
- Use the range slider in the masking parameters to isolate the target focal plane: Foreground, Midground, or Background.
- Adjust the boundary feathering to ensure clean, artifact-free transitions around complex organic edges like hair or foliage.
- Apply Localised Color Grading:
- Scroll down within the active mask sub-panel to access Color Grading.
- Use the localized three-way color wheels (Shadows, Midtones, Highlights) to grade the isolated depth zone independently (e.g., adding cool tints to atmospheric backgrounds while keeping foreground subjects neutral).
3. Asynchronous Background Execution and Pipeline Optimization
Lightroom Classic 16.0 decouples heavy machine-learning and export operations from the main application user interface thread, offloading tasks to asynchronous worker queues.
Workflow and Execution Management:
- Triggering Background Tasks:
- Batch operations such as AI Denoise, neural depth generation, and multi-image exports automatically route to background execution threads.
- You can immediately switch images, cull photos, or continue editing sliders in the Develop module without interface freezes or UI thread latency.
- Monitoring Process State:
- Monitor background execution via the process indicator icon located on the application Identity Plate.
- Clicking the indicator displays active queue items (e.g., Denoise batch progress, Assisted Culling, or Duplicate Detection).
- Pausing Hover Renders During Peak Load:
- When working with heavy catalog operations, hold the Shift key while hovering over Presets, Snapshots, or History states to temporarily pause live preview rendering and free CPU/GPU cycles.
- Pre-Export Model Verification:
- When running batch exports, Lightroom checks active edits against its current neural models. If older edits require synchronization, respond to the AI Updates Required prompt to ensure all output files render using current ML weights.
4. Edge Distortion Correction via the Projection Slider
Wide-angle optics stretch peripheral objects—most noticeably human faces and rectilinear geometry placed near the edge of the frame. The Projection slider introduces a non-linear spherical transformation algorithm to resolve this distortion.
Step-by-Step Workflow:
- Access the Tool: Open the Crop / Transform (Upright) panel in the Develop module.
- Locate Projection: Find the dedicated Projection slider positioned beneath the perspective controls.
- Correct Perimeter Anamorphic Stretch:
- Drag the Projection slider to apply spherical coordinate remapping.
- The algorithm compresses stretched edge pixels back toward the optical center while preserving the rectilinear integrity of centrally framed subjects.
- Evaluate Composition:
- Use the Crop Opacity overlay slider to see the non-destructive cropped boundary margins during the adjustment.
- Because spherical compression pulls edge elements inward, facial proportions are restored without forcing aggressive canvas cropping.
Download this PDF for a more detailed idea of the direction for Lightroom and the developments introduced the release of V 16.0