
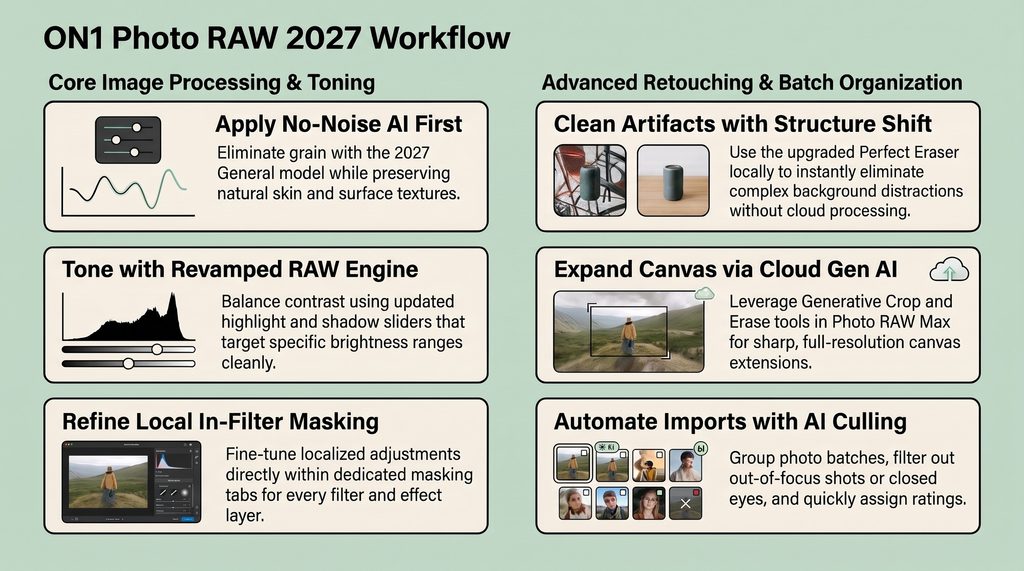
The provided text offers a comprehensive demonstration of the new features and workflow improvements in ON1 Photo RAW 2027, highlighting enhancements designed to streamline photo editing.
Key updates include:
- A revamped RAW engine for superior image handling, an improved No Noise AI tool with specialized models like general and astro settings
- Integrated masking controls built directly into individual filters and adjustments.
- Additionally, the software features an upgraded Perfect Eraser utilizing a structure shift method for removing unwanted distractions without cloud reliance.
- For Max subscribers, advanced tools like Cloud Gen AI generative erasing, canvas extension cropping, and a culling assistant streamline batch processing and organization.
These improvements collectively provide users with a faster, more intuitive, and precise editing experience across various photography styles.
This post and guide deck is built to help photographers of all experience levels to understand the features available in the standard version of ON1 Photo RAW 2027 as well as the advanced tools that are exclusive to the MAX version. You can download and try ON1 Photo RAW as a complete, non-destructive photo editor and organizer along with free practice files and full video training recordings, so you can practice at your own pace using the workflow suggested in the Quick Start Guide: 4 Steps to Better Edits Fast detailed below.
Key Products & Features
- AI-Powered Tools: Built-in features include AI masking, NoNoise AI, Portrait AI, Resize AI, and Sky Swap AI.
- ON1 Photo RAW 2027: An all-in-one editor and organizer featuring an updated RAW processing engine for more predictable highlight and shadow control.
- ON1 Photo RAW MAX 2027: Includes all core editor features plus plugins for Photoshop, Lightroom, Capture One, and Affinity, alongside cloud sync.
Quick Start Guide: 4 Steps to Better Edits Fast
If you want fantastic results right away without getting bogged down in complex menus, give this everyday step-by-step workflow a try:
- Step 1: Clean Up Grain: Load your photo into the module by navigating to
Develop Pane -> Noise & Sharpening, and click No Noise AI (using the General Model). Click Apply. - Step 2: Refresh RAW Colors & Tones: Open
Develop Pane -> Toning & Color, click the RAW Engine drop-down menu, and select 2027. Pull back Highlights to restore bright skies or boost Shadows to warm up dark shadows cleanly. - Step 3: Auto-Enhance with Brilliance AI: Turn on Brilliance AI (now set to a balanced 50% default strength) to instantly give your photo natural pop, and toggle on local adjustments if you want automatic sky or background enhancements.
- Step 4: Erase Distractions: Grab the Perfect Eraser under
Retouch Tools -> Perfect Eraser, set the Method drop-down menu to Structure Shift, and paint over unwanted objects to watch them disappear.
Detailed Feature-by-Feature User Guide
Master Grain Removal: No Noise AI (2027 Model)
Noise reduction in Photo RAW 2027 has received a massive processing boost under the hood. The new default 2027 High Detail model is specifically designed to scrub away heavy noise and digital grain – even on tough shots taken at ISO 4000, 6400, or beyond – while preserving the crisp, natural texture of your subject.
While the engine offers specialized models (Astro, People, Wildlife, and Scanned Film), keeping the model set to General is your absolute best bet roughly 70% of the time. In fact, even when shooting animals, sticking with the General model is often preferred over the Wildlife model to avoid over-processing fine fur and feather textures.
- When to Switch Models:
- Astro: Specifically tuned for deep night skies. The Astro model preserves the natural size and soft texture of stars rather than over-crisping them into artificial white dots.
- File Format Versatility: No Noise AI works seamlessly on raw files as well as standard image formats like JPEGs, PNGs, and TIFFs.
Coach’s Tip: Keep an Eye on the Micro Sharpening Slider When fine-tuning your noise settings, take a quick look at the Micro Sharpening slider. Pushing this slider up too far can actually re-introduce crunchy grain back into your photo! I recommend keeping the Micro Sharpening slider well under 200 (ideally maxing out around 99). The 2027 High Detail engine already restores plenty of natural crispness on its own.
Better Base Images: The New RAW Engine & Brilliance AI
The core raw processing engine has been rebuilt from the ground up for 2027. Replacing the older legacy engine, it processes photos with cleaner brightness, lifelike color reproduction, and rich contrast right when you open a photo.
- Natural Highlights & Targeted Shadows: To try it out, head to
Develop Pane -> Toning & Color -> RAW Engine dropdown -> Select 2027. In older legacy engines, bright light on faces or backgrounds could look flat or blown out when highlights were pulled back. The 2027 RAW Engine intelligently targets bright highlights to pull back hidden detail without flattening overall image tone. Similarly, boosting the Shadows slider brightens dark areas while leaving your highlights untouched. - Legacy Preset Support: Don’t worry if you have older favorite presets! You can easily switch back to the Legacy engine under the Toning & Color pane at any time.
- Refined Brilliance AI: Brilliance AI now works hand-in-hand with the 2027 RAW engine. Its default strength has been lowered to a subtle 50% (down from 100%) for a far more natural, balanced look. Additionally, targeted local adjustments (such as automated edits for sky, water, or flora) can now be toggled on with a single click inside the pane.
Precision Editing: Built-in Masking & Intersect Modes
Masking is faster and more intuitive than ever! In Photo RAW 2027, Linear Gradient and Radial Gradient are now completely separate, standalone icons on the toolbar – no more hunting through drop-down sub-menus. Furthermore, every single filter, local adjustment, and effect panel now features its own dedicated Masking Tab built right into the pane.
Core Masking Tools & Previews
- Hover Previews: Hover your mouse cursor over any mask thumbnail to see a live visual overlay. You can customize the visual mode (such as grayscale or color while brushing) by clicking the overlay icon in the bottom toolbar.
- Built-in Refinement Controls: Fine-tune any active mask directly inside its panel using targeted sliders for Feathering, Shift Edge, Density, Levels, and Window.
- Manual Gradient Placement: Select the standalone Linear or Radial gradient tool, turn on “Show mask while adjusting” in the top menu bar, and click and drag directly onto your photo to tilt, resize, and place your gradient exactly where you want it.
Fine-Tuning Highlights & Shadows with the Blending Tab
When applying dramatic masks, like darkening a bright sky, feathering can sometimes push dark edits onto bright mountain peaks or dark shadow areas below. You can easily fix this without manual re-brushing:
- Navigate to the Blending Tab, located directly adjacent to the Masking Tab inside your active Local Adjustment or Effect pane.
- Locate the Protect -> Shadows slider and drag it upward.
- Watch as the dark adjustment instantly pulls back off your mountain shadow areas while leaving the sky edit completely intact!
Advanced Mask Combinations & Intersect Modes
- Subtracting Unwanted Areas: Remove automated selections easily by opening the Masking Tab, selecting Subtract, and using Quick Mask AI to paint over areas you want to exclude (such as removing an edit from a salmon held in a bear’s mouth).
- Combining Luminosity & Gradients: Create a Luminosity Mask to select all bright areas in a frame, then click Subtract -> Linear Gradient and drag from the bottom up. This restricts your bright-area edits strictly to the top of your frame!
- Intersect Mask Mode: Intersect Mode works just like a Venn diagram – adjustments apply only to the overlapping area where two masks meet. For instance, by intersecting a Subject Mask with a Linear Gradient, you can selectively cast soft light across just the left side of your subject’s face.
- Composite Masking Note: The mask layer previously known as “Target Mask” in the 2026 version has been officially renamed to Composite Mask in Photo RAW 2027.
Quick Object Removal: Upgraded Perfect Eraser
The standard Perfect Eraser has been upgraded directly inside the main editing engine. That means you do not need an active internet connection, cloud credits, or a Max subscription to clean up your shots!
- Structure Shift Method: To use the upgraded engine, select your retouching tool via
Retouch Tools -> Perfect Eraser -> Method dropdown -> Select Structure Shift. This updated algorithm excels at analyzing and filling in complex geometric backgrounds. - Practical Cleanup Examples: Use it to remove clipped branches along frame edges, clean off unwanted stickers on brick walls, or erase light fixtures and ceiling vents.
- Simple Brush Workflow: Paint directly over the unwanted element. Don’t worry if your first pass leaves a slight trace—simply brush over the area a second time to continuously refine the pattern matching without needing complex manual cloning tools.
Advanced Photo RAW Max Features
Note: The powerful workflow tools in this section are exclusive to ON1 Photo RAW Max.
Generative Eraser & Generative Crop (Cloud Gen AI)
Photo RAW Max introduces Cloud Gen AI, delivering cloud-powered editing with twice the sharpness and detail of older generative models to seamlessly match your high-resolution cameras.
- Generative Eraser (Hybrid Selection Workflow): Effortlessly reconstruct busy scenes. Navigate to
Retouch Tools -> Generative Eraser -> Gear Icon -> Method -> Cloud Gen AI. You can paint manually or click automatic target buttons under Distractions (such as Vehicles or People).- Hybrid Selection: When you click a target button, the AI highlights detected objects with a red overlay. If it misses partial elements (like a stray pedestrian or a leftover bumper), simply grab your manual brush and paint additional red strokes over those extra spots before clicking Generate.
- Generative Crop (Canvas Extension): Press
Con your keyboard to open the Crop Tool, and set the top menu option toCanvas Extension -> Cloud Gen AI. Drag your canvas handles outward to extend your image borders:- Lead Room: Add natural space in front of running wildlife or birds in flight.
- Fix Cut-Off Elements: Extend clipped bird wings seamlessly back into the frame.
- Leveling Horizons: Level crooked shots (like hot air balloons overhead) without slicing off top or side subjects.
Instant Photo Sorting: The Culling Assistant
This step alone will save you hours after a busy weekend shoot! Access the Culling Assistant directly in the Browse Module to organize hundreds of session photos in three structured steps.
Step 1: Analyze
- Open the Culling Assistant pane and choose your target session type (e.g., Portrait/Wedding).
- Set your maximum group size (e.g., up to 10 photos per similar sequence).
- Toggle on the automated rejection boxes: Reject blurry photos and Reject photos with eyes closed.
- Click Analyze. The assistant will analyze your images, group similar frames, and attach clear visual status badges.
Step 2: Review
- Click Similar to open the side-by-side filmstrip view and step through your image groups.
- Enable Lock Pan & Zoom in the view toolbar to keep focus locked on the same spot across every frame while comparing expressions.
- Click the Focus Check Icon to zoom in instantly and check eye sharpness.
- Turn on the Loop View tool (accessed directly from the bottom toolbar in Browse/Compare view) to examine detail without changing zoom levels:
- Subject Mode: Centers and magnifies the primary subject automatically.
- Faces Mode: Isolates and zooms in on human faces.
- Cursor 1:1 Mode: Opens a floating 100% detail loupe wherever your mouse hovers.
Quick Keyboard Shortcuts for Fast Sorting:
R– Mark the selected photo as Rejected.Shift + Right Arrow– Skip instantly to the next similar image group.C– Select the Crop Tool.
Step 3: Organize
- Open the organization settings tab to set automatic sorting rules: assign a 5-Star Rating to kept photos and a 1-Star / Red Label to rejected photos.
- Return to the main catalog view and set your display sort to Descending Rating. Your top 5-star photos will gather right at the top of your screen, while rejected photos sink to the bottom!
Summary – Feature Availability Matrix
| Feature / Capability | Required Version & Access Level |
|---|---|
| No Noise AI (2027 High Detail Model) | Included in Standard 2027 & Max (No Cloud Needed) |
| Revamped RAW Processing Engine & Brilliance AI | Included in Standard 2027 & Max (No Cloud Needed) |
| Built-in Filter Masking & Intersect Modes | Included in Standard 2027 & Max (No Cloud Needed) |
| Upgraded Perfect Eraser (Structure Shift Method) | Included in Standard 2027 & Max (No Cloud Needed) |
| Cloud Gen AI (Generative Eraser & Generative Crop) | Requires Photo RAW Max (Cloud Gen AI Enabled) |
| Automated Culling Assistant | Requires Photo RAW Max |