The converter is designed to require no technical knowledge. As with all our Apps it is FREE, runs on modern web browsers and entirely locally so your personal data is not at risk and your images will not be ‘scraped’ or used for AI training purposes.You do not need a login, there is no fee to pay, no subscription and they are neither time or feature limited. You can access it here.
Adobe’s Extensible Metadata Platform (XMP) is a file labeling technology that lets you embed metadata into files themselves during the content creation process. Our software allows users to upload reference pictures and apply XMP recipe files, which contain specific photographic adjustments like exposure, contrast, and tone curves. Through an interactive interface, photographers can fine-tune tonal settings using sliders and monitor changes via a real-time histogram and audit log. The system is specifically engineered to extract metadata from presets to reconstruct visual styles on a browser-based canvas.
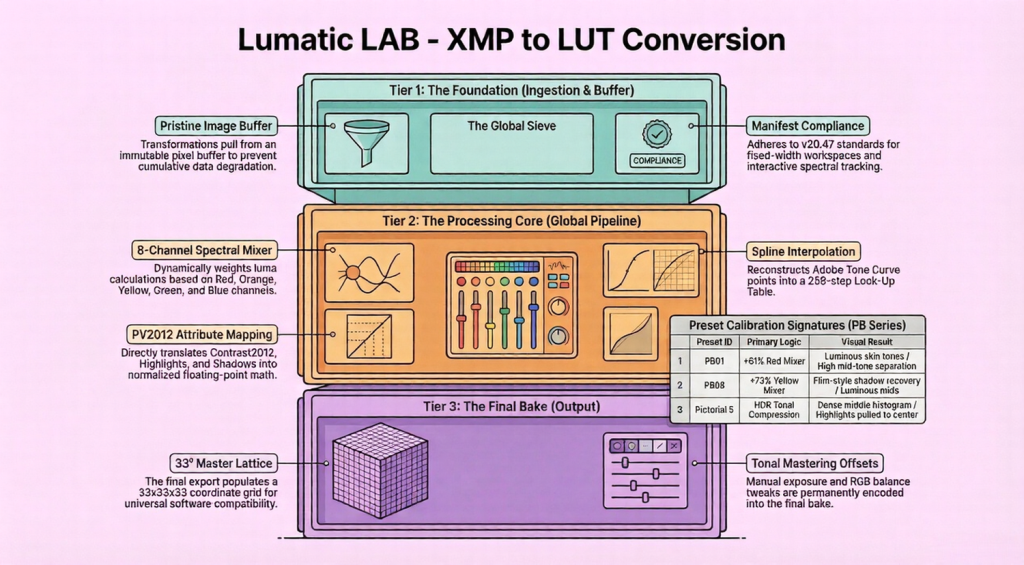
The Absolute Redraw Protocol (also referred to as the Absolute Rendering Protocol) is a strict technical standard used in the Lumatic Lab engine where every change made to an XMP preset is pulled straight from the original, unedited raw source image
Finally, the tool enables the export of finished images as JPEGs or the generation of 3D LUTs for use in professional color grading workflows.
Short User Guide
XMP Convertor.
What the Tool Does
GRD Convertor allows you to:
- Open a photo
- Load a Photoshop gradient file (.GRD)
- Preview how the gradient changes the photo
- Adjust brightness and strength of the effect
- Save the result as a JPG image
The tool runs entirely inside a web browser.
Basic Workflow
| Step | What to Do |
|---|---|
| 1 | Load an image |
| 2 | Load a GRD gradient file |
| 3 | Select a gradient |
| 4 | Adjust brightness or intensity |
| 5 | Save the final image |
Step-by-Step Instructions
1. Load an Image
- Click “Drop Image” – Choose a photo from your computer, it will appear in the main preview area.
- Click “Drop .GRD File” – Select a Photoshop gradient file (.GRD) – The gradients in the file will appear in a list called Gradient Stack. You can click different gradients to compare them.
Adjusting the Effect
Two sliders allow you to fine-tune the result.
| Control | What it Does |
|---|---|
| Exposure | Makes the image brighter or darker |
| Intensity | Controls how strong the gradient effect is |
For example:
- Lower Intensity if the colours look too strong and obviously increase Exposure if the image becomes too dark.
Save the Image
When you are happy with the preview:
- Click “Save .JPG” – The edited image will download to your computer and includes all adjustments made with the sliders.
Optional Features
Histogram
A small graph above the sliders shows how brightness is distributed in the image. It is only for visual reference and does not require any action.
Clear Gradients
Click “Clear All” to remove all gradients from the list.
Simple Tips
- Try several gradients before adjusting the sliders – Use Intensity first, then adjust Exposure if needed.
- Your original photo is never changed — the tool only saves a new JPG.